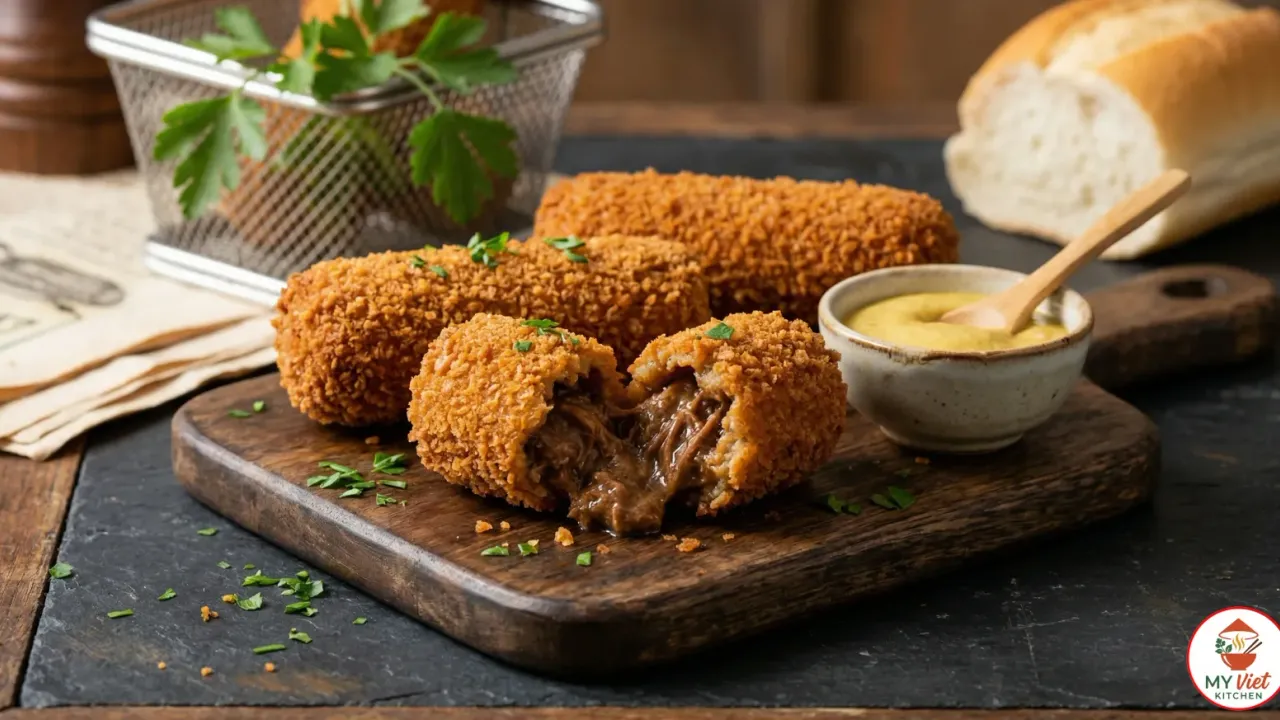
Kroket is the golden, crispy snack that defines Dutch street food, and this kroket recipe walks you through every step of making it from scratch at home. These deep-fried croquettes hide a molten, savory beef ragout beneath a shatteringly crisp breadcrumb shell. One bite reveals the soul of Netherlands cuisine: humble ingredients transformed into something extraordinary through patience and technique. Whether you have tasted kroket from an Amsterdam vending machine or you are discovering it for the first time, this recipe delivers the real thing.
Prep Time: 45 minutes | Cook Time: 15 minutes (plus 90 minutes braising + 4 hours chilling) | Servings: 12 croquettes
Difficulty: Medium | Calories: ~210 per kroket
What Makes Kroket Special?
The magic of kroket lies in the contrast between outside and inside. The exterior is a thin, impossibly crisp shell of golden breadcrumbs. Crack through it, and you find a molten, velvety filling of slow-braised beef bound in a rich roux. That contrast between crunch and cream is what makes every bite so satisfying. No other snack in European cuisine delivers quite the same textural thrill.
Dutch kroket has roots stretching back to the French croquette, which arrived in the Netherlands during the 18th century. Over time, the Dutch made it entirely their own. While French croquettes lean toward delicate fillings with bechamel, the Dutch version is bolder, meatier, and deeply savory. The ragout filling slow-cooks for hours, concentrating the beef flavor into something almost gravy-like in richness. This is not a dainty appetizer. It is honest, filling food built for cold weather and hungry appetites.
What truly sets kroket apart is its place in Dutch daily life. You will find them in FEBO vending machines on street corners, tucked into soft rolls at lunch counters, and served on white plates at upscale restaurants. From factory workers to executives, everyone in the Netherlands eats kroket. It is the great equalizer of Dutch food culture. Additionally, the process of making them from scratch at home is deeply rewarding. The ragout filling can be prepared days ahead, making the final frying quick and effortless.

Choosing the Right Beef for Kroket
The beef is the heart of your kroket filling. Selecting the proper cut determines whether your ragout is silky and flavorful or dry and bland. Here are the best options to consider.
- Beef chuck (best choice): This well-marbled cut from the shoulder has the ideal balance of meat and connective tissue. During slow braising, the collagen breaks down into gelatin, giving the ragout its signature silky, luscious body. Chuck shreds easily into fine strands that disappear into the roux.
- Beef short ribs: Rich in fat and collagen, short ribs produce an intensely flavorful ragout. They require slightly longer braising but reward you with exceptional depth. The higher fat content makes the filling extra creamy after chilling. Remove the bones before shredding.
- Beef brisket: A solid alternative with good flavor and connective tissue. Brisket braises well and shreds into long, tender fibers. It produces a slightly leaner filling than chuck, so consider adding an extra tablespoon of butter to the roux for richness.
- Pre-ground beef (not ideal): Ground beef is tempting for speed, but it produces a grainy, uniform texture that lacks the pull-apart quality of braised meat. The filling will taste flat and one-dimensional. For authentic kroket, always start with whole cuts that you braise and shred yourself.
Ingredients for Kroket
Ragout Filling:
- 1 pound beef chuck, cut into 1-inch cubes
- 2 cups beef broth
- 1 bay leaf
- 4 tablespoons unsalted butter
- 1 small onion, finely diced
- 1 medium carrot, finely diced
- 1 celery stalk, finely diced
- 2 cloves garlic, minced
- 1/3 cup all-purpose flour
- 1 tablespoon Worcestershire sauce
- 1 tablespoon soy sauce
- 1 teaspoon Dijon mustard
- 1/4 teaspoon ground nutmeg
- 1/2 teaspoon white pepper
- Salt to taste
- 2 tablespoons fresh parsley, finely chopped
Breading Station:
- 1 cup all-purpose flour
- 3 large eggs, beaten
- 2 cups fine dry breadcrumbs (panko or Dutch paneermeel)
For Frying and Serving:
- Vegetable oil for deep frying (about 4 cups)
- Yellow mustard for serving
- Soft bread rolls (optional, for broodje kroket)
Pro tip: The secret weapon in authentic Dutch kroket is a splash of soy sauce. It may sound unusual, but soy sauce amplifies the meaty umami flavor of the ragout without making it taste Asian. Many traditional Dutch snack bars have used this trick for decades. Combined with Worcestershire sauce and Dijon mustard, it creates a filling that tastes deeply savory and complex.
Step-by-Step Instructions
Step 1: Braise the Beef
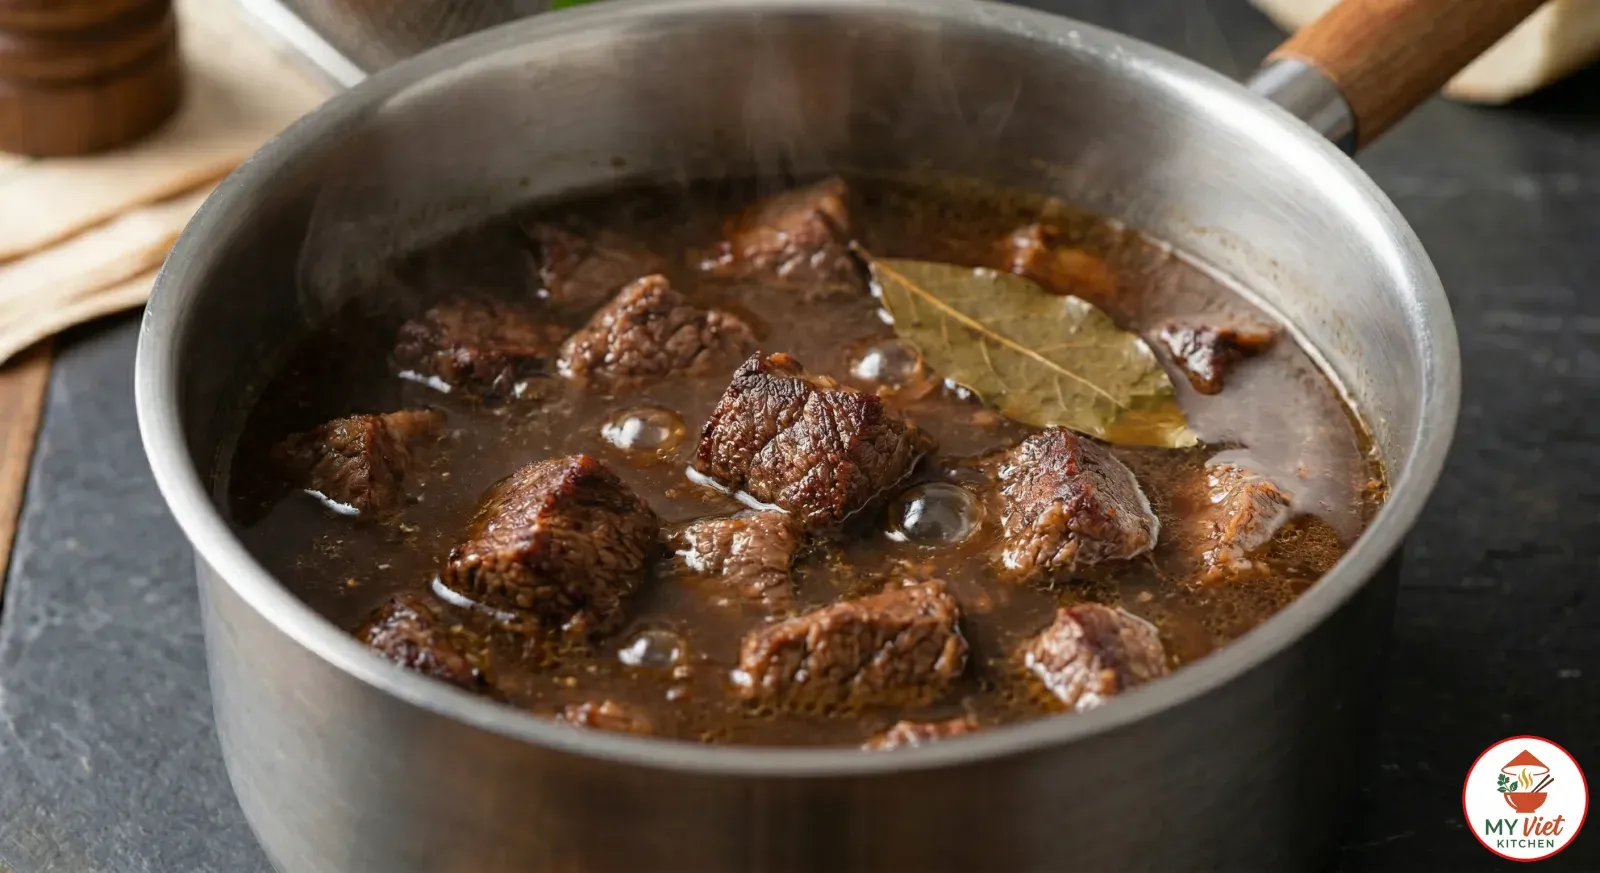
1 Place the beef chuck cubes in a medium saucepan and pour in the beef broth. Add the bay leaf and bring everything to a gentle simmer over medium heat. Do not let the liquid boil aggressively. A hard boil toughens the exterior of the meat before the interior has time to soften.
Reduce the heat to low, cover the pan, and let the beef braise for 90 minutes. Check occasionally to make sure the liquid stays at a lazy bubble. The beef is ready when it falls apart at the touch of a fork. Remove the meat with a slotted spoon and shred it finely using two forks. Strain and reserve the braising liquid, as you will need it for the roux. Discard the bay leaf.
Step 2: Make the Roux Base
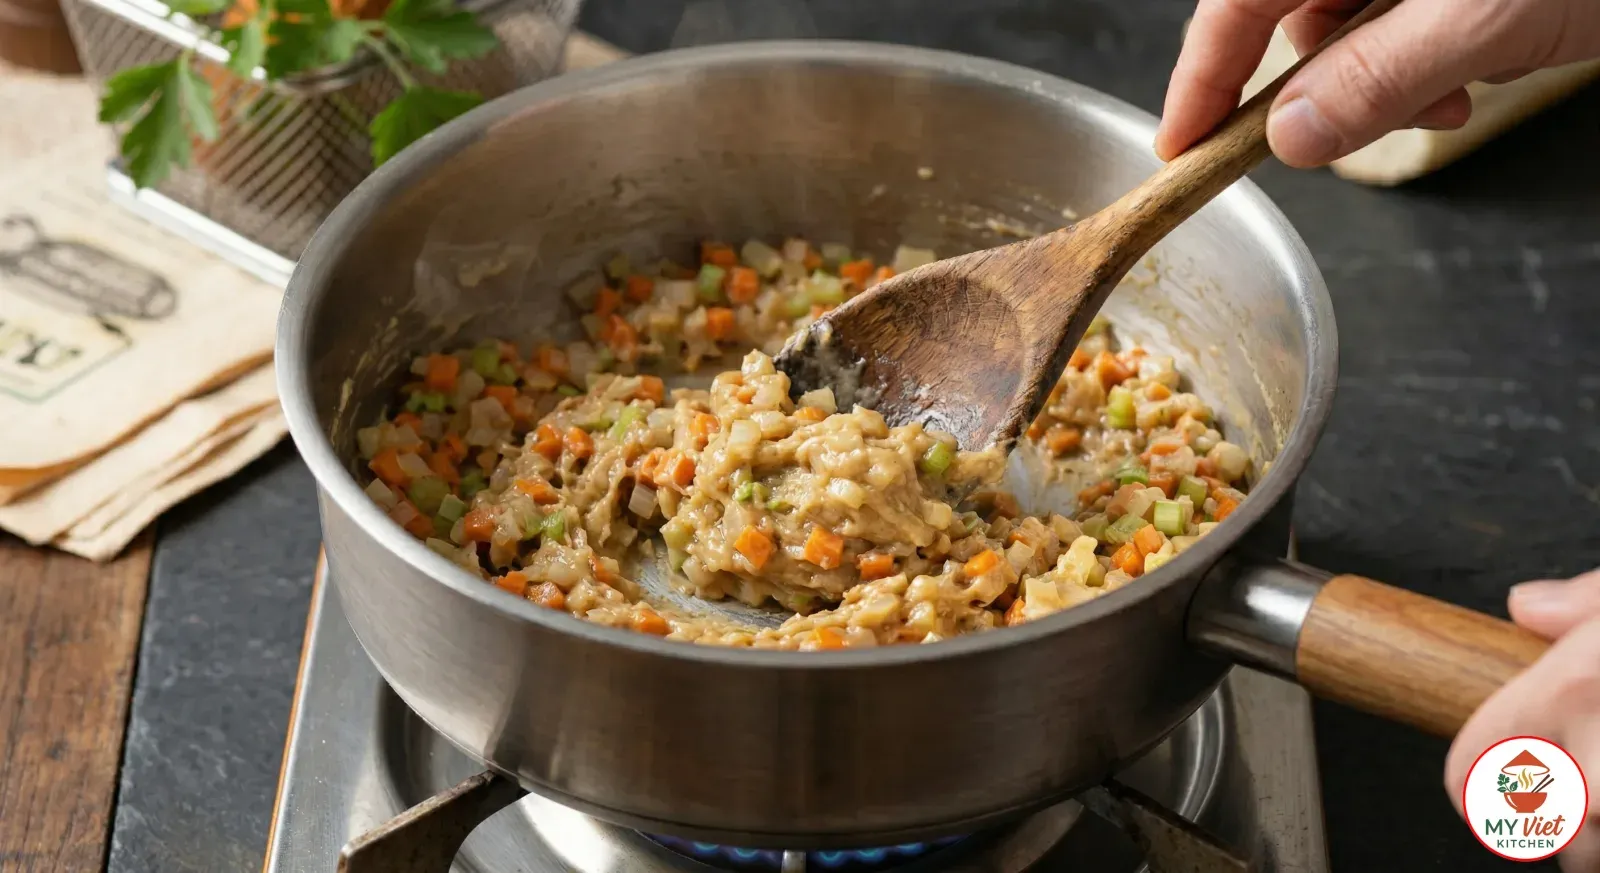
2 Melt the butter in a large saucepan over medium heat. Once the foaming subsides, add the finely diced onion, carrot, celery, and minced garlic. Saute the vegetables for 6 to 8 minutes, stirring frequently, until they are soft and fragrant. The onion should be translucent and the carrot tender.
Sprinkle the flour over the vegetables and stir constantly for 2 full minutes. This step cooks out the raw, pasty taste of the flour and builds the foundation of your roux. The mixture will become thick and clump around the vegetables. That is exactly what you want. Keep stirring so the flour does not scorch on the bottom of the pan.
Step 3: Build the Ragout
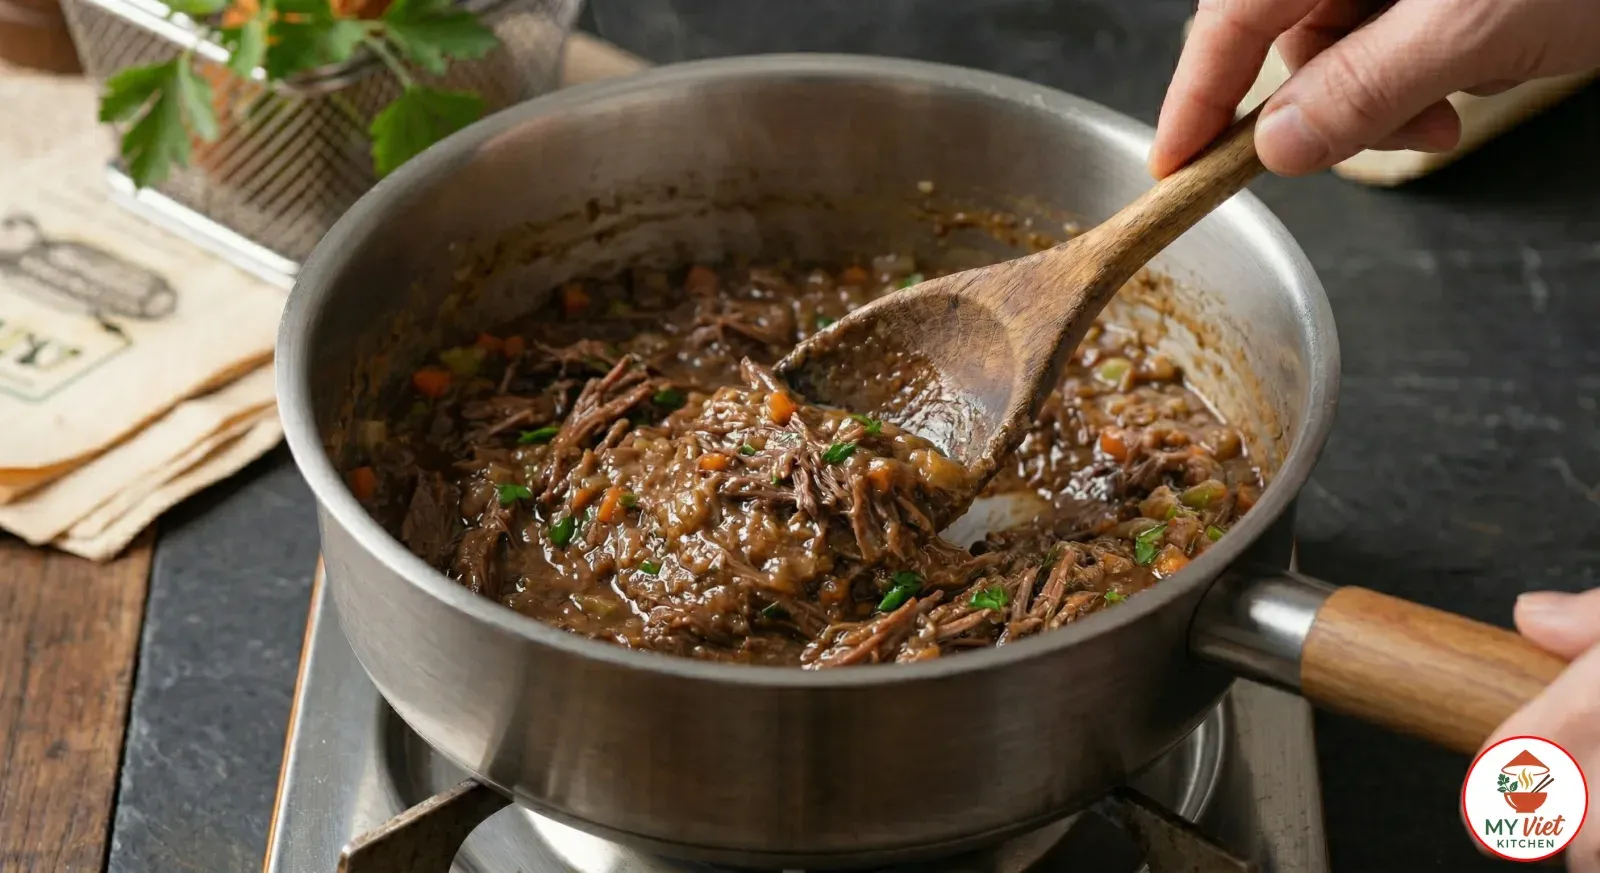
3 Begin adding the reserved braising liquid to the roux, about a quarter cup at a time. Stir vigorously after each addition to work out any lumps. The mixture will seize up at first, but keep adding liquid and stirring until you have a thick, smooth sauce. Patience here prevents a lumpy filling.
Fold in the shredded beef, Worcestershire sauce, soy sauce, Dijon mustard, nutmeg, and white pepper. Stir everything together and cook over medium-low heat for another 5 minutes. The ragout should be very thick, almost like a stiff paste that pulls cleanly away from the sides of the pan. Stir in the fresh parsley, taste for salt, and remove from heat. The mixture will thicken further as it cools.
Step 4: Chill the Filling
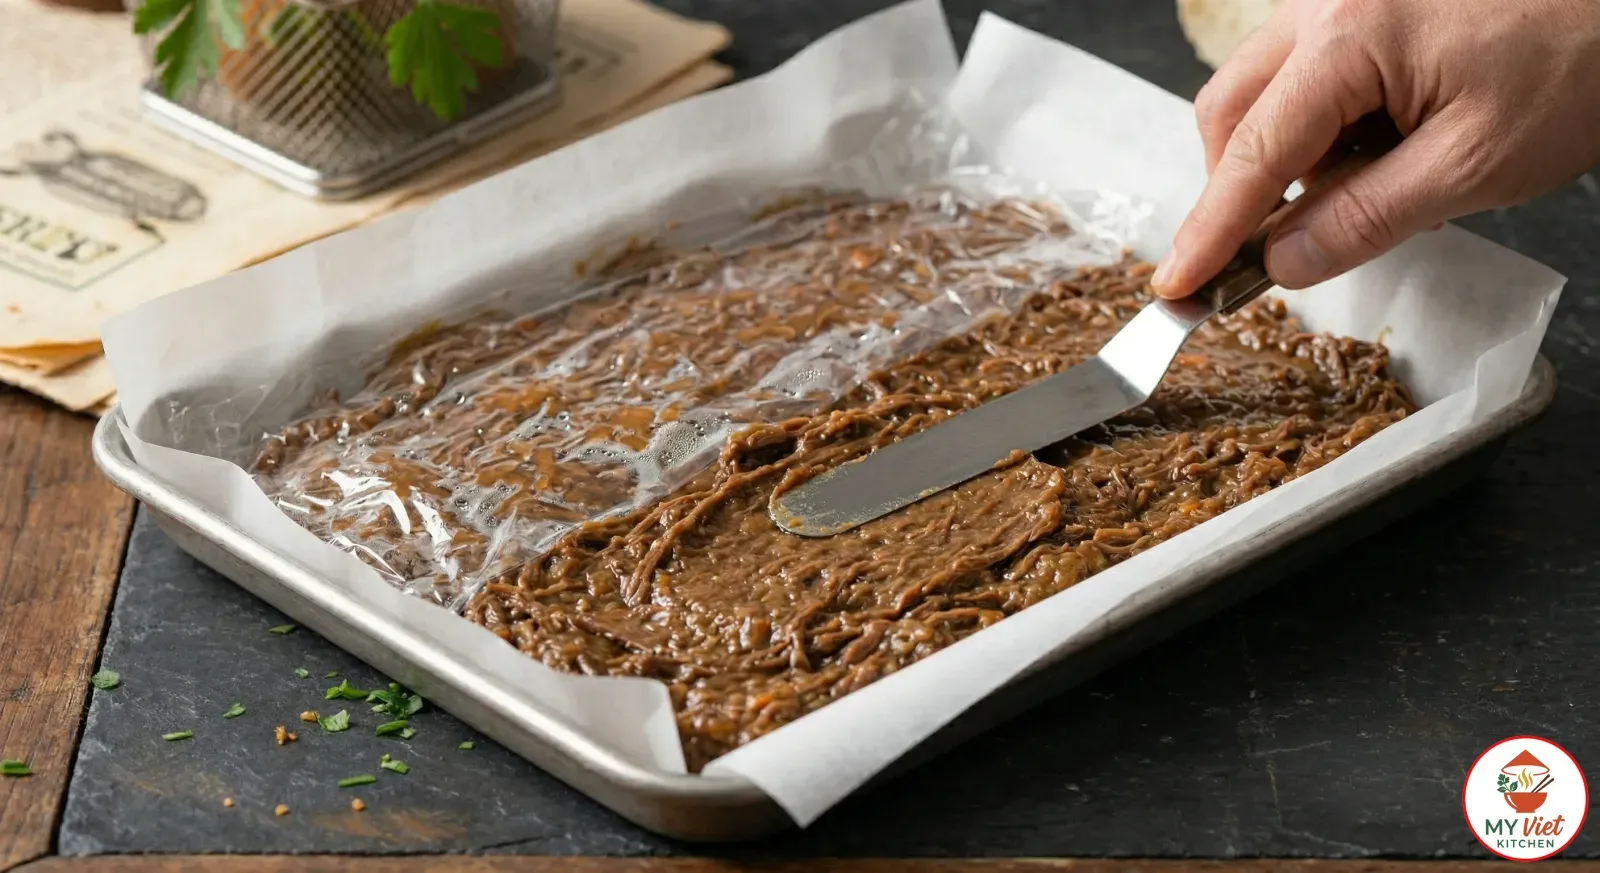
4 Line a baking sheet with parchment paper and spread the hot ragout into an even layer about 1 inch thick. Work quickly because the mixture stiffens as it cools. Smooth the top with a spatula and press a sheet of plastic wrap directly onto the surface. This prevents a skin from forming.
Refrigerate for at least 4 hours, though overnight is even better. The filling must be completely cold and firm before you attempt to shape it. Warm or soft ragout will fall apart during breading and explode during frying. This chilling step is non-negotiable for successful kroket. Plan your time accordingly, and consider making the ragout a full day ahead.
Step 5: Shape the Kroket
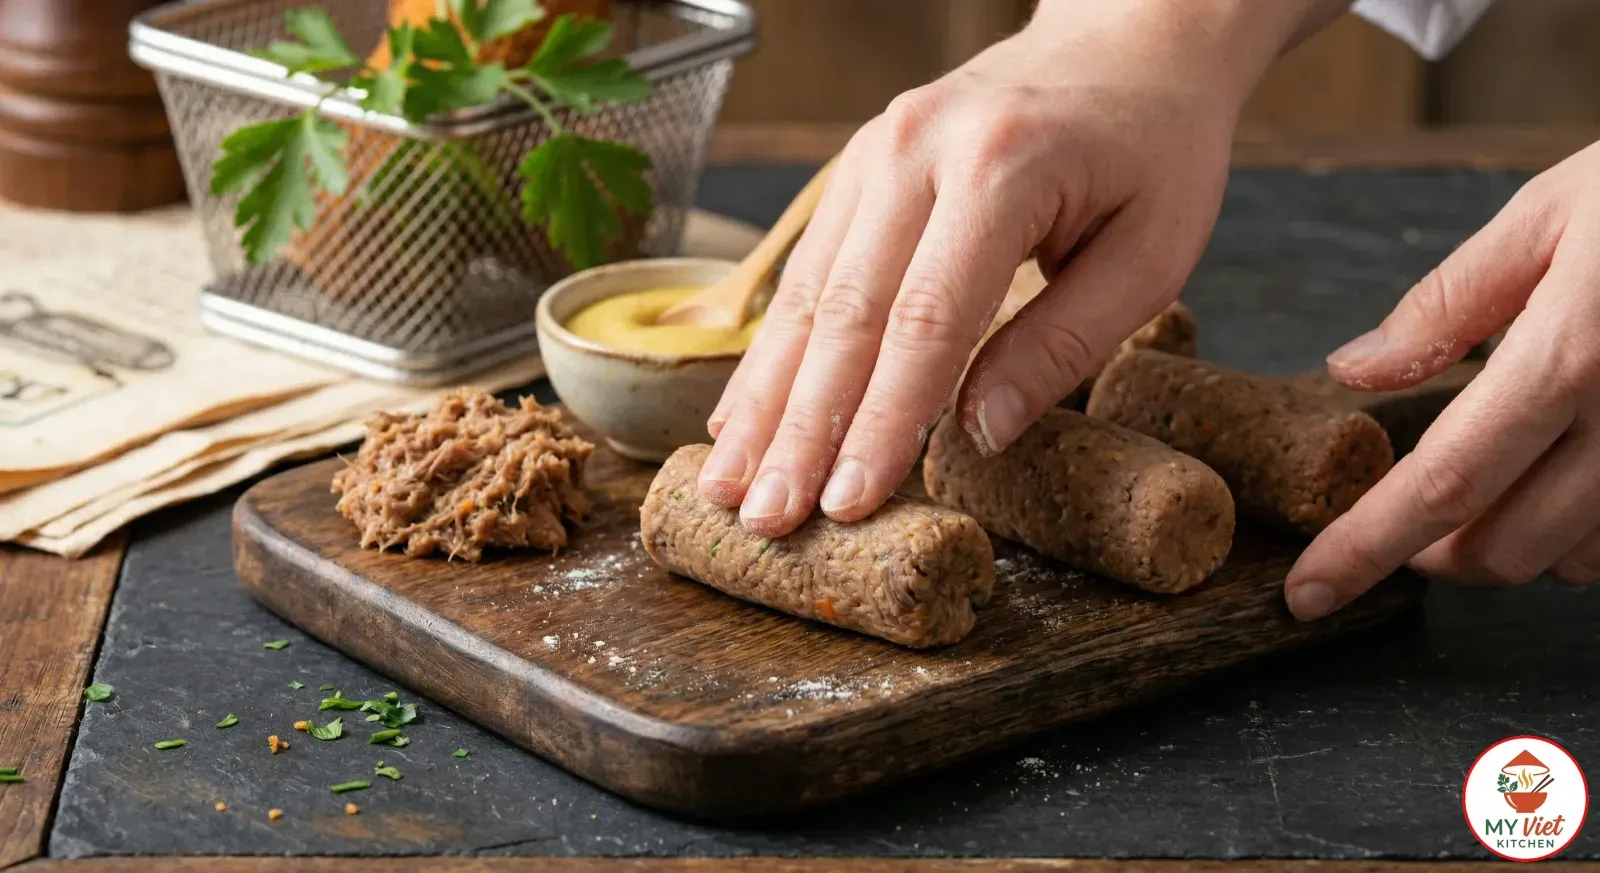
5 Remove the chilled ragout from the refrigerator. Using a knife, divide it into 12 equal portions. Dust your hands lightly with flour to prevent sticking. Take one portion and roll it between your palms into a smooth cylinder about 4 inches long and 1.5 inches thick.
Place each shaped kroket on a parchment-lined tray as you work. Once all 12 are formed, transfer the tray to the freezer for 30 minutes. This brief freeze firms the outside of each kroket and makes the breading step much easier. Cold, firm croquettes hold their shape and accept an even coating of breadcrumbs without crumbling or sticking.
Step 6: Bread the Kroket
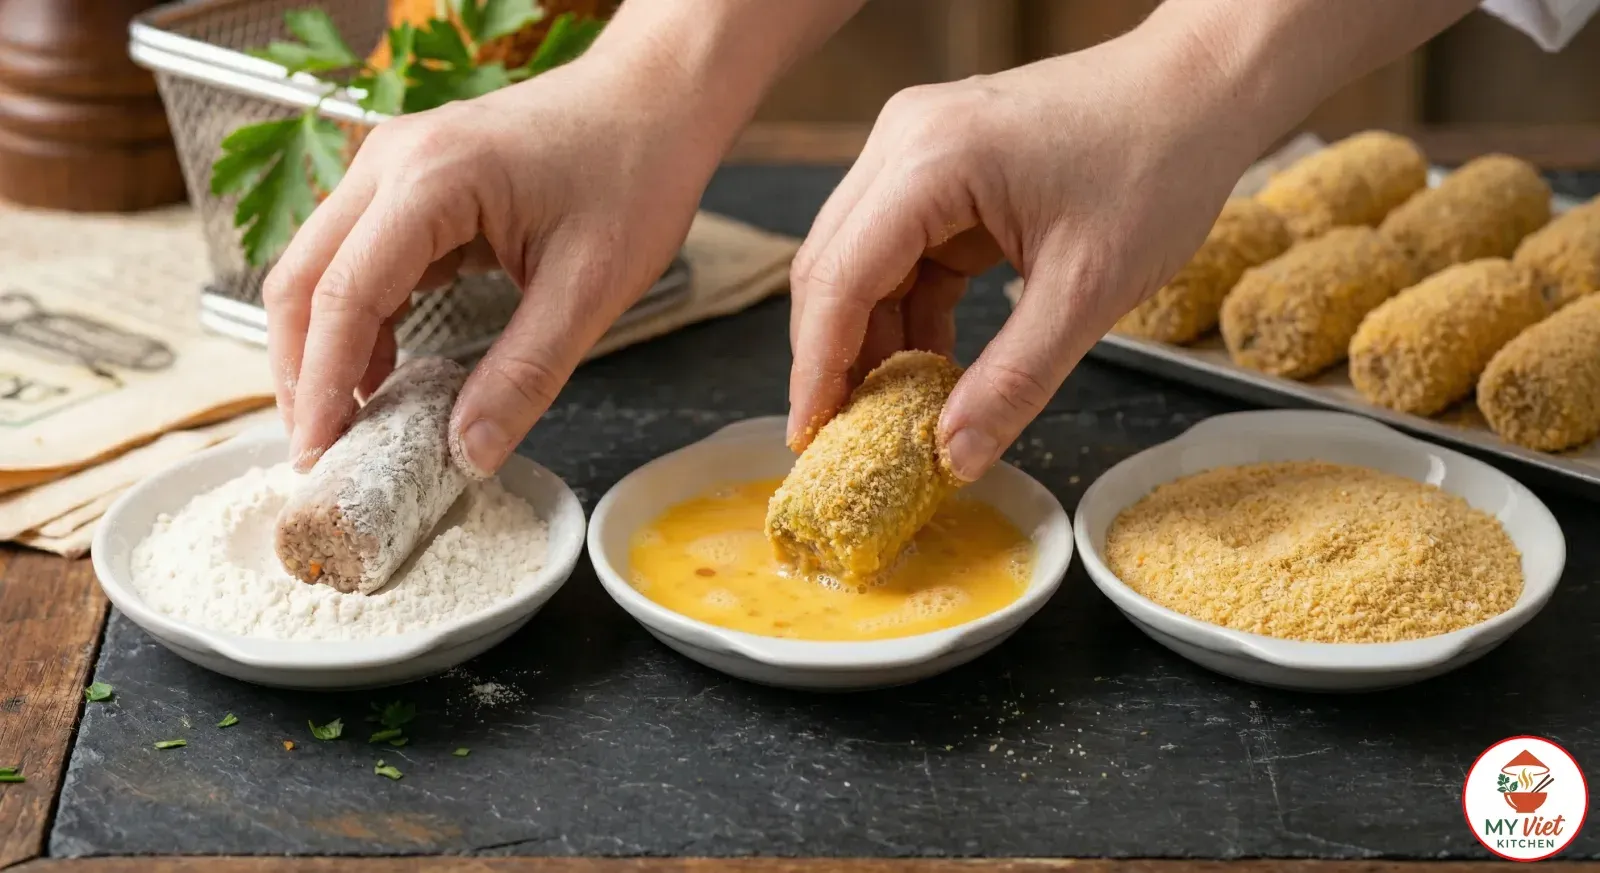
6 Set up a three-station breading line on your counter. Place the flour in the first shallow dish, beaten eggs in the second, and breadcrumbs in the third. Take each chilled kroket and roll it first in flour, shaking off any excess. Then dip it in the beaten egg, letting the excess drip off.
Roll the kroket in breadcrumbs, pressing gently so they adhere evenly on all sides. Now repeat the egg and breadcrumb step for a second coat. This double breading creates the thick, armor-like shell that keeps the molten filling sealed inside during frying. Place the breaded kroket back on the tray and refrigerate for 15 minutes before frying. This final rest sets the coating.
Step 7: Deep Fry Until Golden
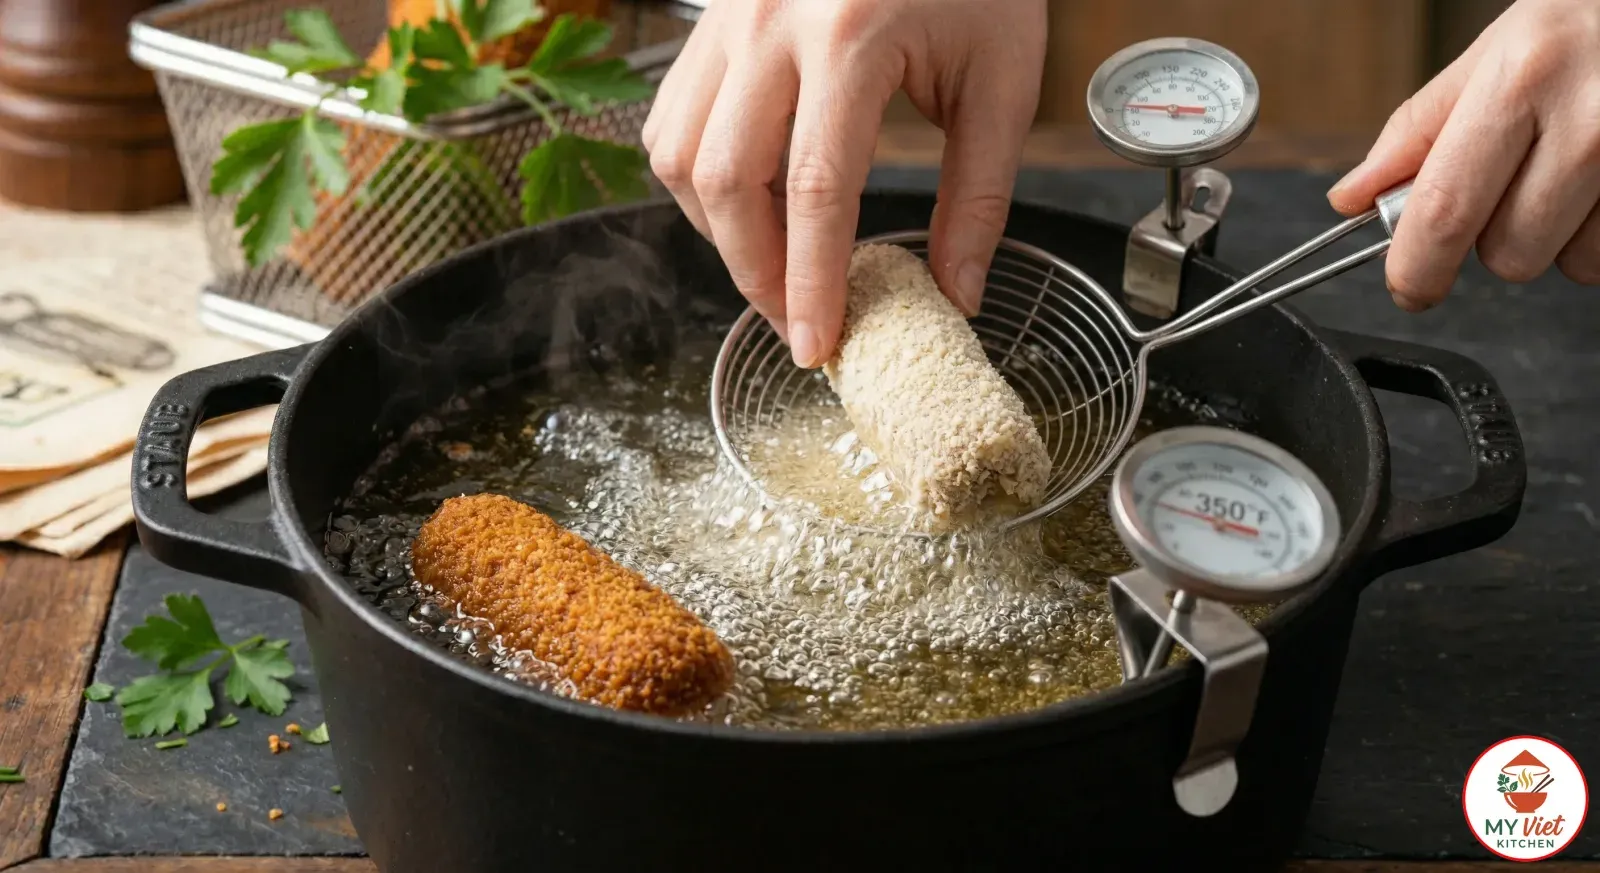
7 Pour vegetable oil into a deep pot or Dutch oven to a depth of at least 3 inches. Heat the oil to 350 degrees Fahrenheit, using a thermometer for accuracy. Temperature control is critical here. Oil that is too cool produces greasy, soggy kroket. Oil that is too hot burns the coating before the inside heats through.
Carefully lower 3 or 4 kroket into the hot oil using a slotted spoon. Do not overcrowd the pot, as adding too many at once drops the oil temperature. Fry for 3 to 4 minutes, turning once with tongs, until the croquettes are deep golden brown on all sides. Lift them out and drain on a wire rack set over a baking sheet. Serve immediately while the shell is crackling crisp and the inside is molten hot.
Expert Tips for Perfect Kroket
Make the Ragout Extra Thick
The number one rule of kroket-making is a thick ragout. If your filling is too loose or wet, the croquettes will leak or explode during frying. The ragout should be stiff enough to hold its shape when scooped with a spoon. Think of the consistency of cold peanut butter. When in doubt, cook the ragout a few minutes longer to evaporate more moisture. You can always add a splash of broth later if you overshoot.
Double-Bread for Security
A single layer of breadcrumbs is not enough for kroket. The double-breading method creates a sealed barrier that traps the molten filling inside. After the first coat, the second layer of egg and breadcrumbs fills in any thin spots or gaps. This double armor is what allows kroket to survive the intense heat of deep frying without bursting open. Never skip this step.
Monitor Oil Temperature Closely
Keep your frying oil at a steady 350 degrees Fahrenheit throughout the cooking process. Use a clip-on thermometer to track the temperature in real time. Each batch of kroket will cause the temperature to drop temporarily. Wait for the oil to recover before adding the next batch. Consistent heat produces an even, golden crust and a properly heated interior every time.
Croquette Styles Across Europe
Croquettes exist throughout Europe, but each country has developed its own distinct version. Understanding the differences helps you appreciate what makes the Dutch kroket unique among its cousins.
| Country | Name | Typical Filling | Shape | Served With |
|---|---|---|---|---|
| Netherlands | Kroket | Beef ragout in thick roux | Long cylinder | Yellow mustard |
| France | Croquette | Bechamel with chicken or ham | Oval or cylinder | Salad greens |
| Spain | Croqueta | Jamon and bechamel | Small oval | Aioli or on its own |
| Belgium | Garnaalkroket | North Sea shrimp in cream | Cylinder | Fried parsley and lemon |
| Japan | Korokke | Potato with meat or curry | Flat patty | Tonkatsu sauce |
Serving Suggestions
Dutch kroket is remarkably versatile. The way you serve it depends on the occasion and your appetite. From casual snacking to a full meal, these golden croquettes fit every setting with ease.
Classic Accompaniments:
- Broodje kroket: Tuck a freshly fried kroket into a soft white bread roll with a smear of mustard. This is the most popular way to eat kroket in the Netherlands. The soft bread and sharp mustard complement the crispy shell perfectly. It is the ultimate Dutch lunch.
- Yellow mustard: Sharp, tangy Dutch mustard is the traditional dipping sauce. Its bright acidity cuts through the rich, meaty filling and adds a peppery kick. Serve a generous dollop on the side of every plate.
- French fries (patat): In the Netherlands, kroket and fries are a beloved combination from the snack bar. Serve them together with mayonnaise and mustard for the full Dutch frituur experience.
- Pickles and raw onion: Crunchy pickled gherkins and finely diced raw onion provide a fresh, acidic contrast that lightens the richness of the fried croquettes.
Beverage Pairings:
- Dutch pilsner: A cold Heineken, Amstel, or Grolsch lager is the classic match. The crisp carbonation and gentle bitterness cleanse the palate between bites of rich, fried kroket.
- Belgian witbier: A wheat beer like Hoegaarden adds a citrusy, refreshing note that pairs beautifully with the savory beef filling. Its lighter body does not compete with the croquette’s bold flavor.
- Dry white wine: A crisp Sauvignon Blanc or Muscadet offers enough acidity to balance the fried richness. Serve it well chilled for the best contrast.
- Sparkling water with lemon: For a non-alcoholic option, fizzy water with a squeeze of lemon refreshes the palate and lets the kroket’s beefy flavor take center stage.
Storage and Reheating
Refrigerator: Store fried leftover kroket in an airtight container for up to 2 days. The filling stays good, but the crispy coating will soften. Unfried, breaded kroket can be refrigerated for up to 24 hours before cooking.
Freezer: Unfried kroket freeze exceptionally well. Arrange them on a parchment-lined tray in a single layer and freeze until solid, about 2 hours. Transfer to a freezer bag and store for up to 3 months. Fry directly from frozen, adding one extra minute to the cooking time. There is no need to thaw them first.
Reheating: The best way to reheat fried kroket is in a preheated oven at 375 degrees Fahrenheit for 10 to 12 minutes. Place them on a wire rack over a baking sheet so air circulates around all sides. This method restores some of the crispiness. Avoid the microwave entirely, as it turns the breading soggy and rubbery within seconds.
Common Mistakes to Avoid
1. Not Chilling the Filling Long Enough
Impatience is the most common reason kroket fail. If the ragout is still warm or even slightly soft when you shape it, the croquettes will collapse during breading and burst during frying. Give the filling a full 4 hours in the refrigerator. Overnight is even better. Cold, firm ragout holds its cylinder shape and accepts the breadcrumb coating cleanly.
2. Using a Single Layer of Breadcrumbs
One coat of breading is never enough for kroket. The molten filling exerts pressure from inside during frying, and a thin single layer will crack under that stress. Always apply two full rounds of egg and breadcrumbs. The double coating creates a sturdy shell that holds up under the heat of the oil. This is the technique that separates perfect kroket from messy failures.
3. Overcrowding the Fryer
Dropping too many kroket into the oil at once causes the temperature to plummet. Cold oil leads to greasy, pale, undercooked croquettes that absorb fat like sponges. Fry in small batches of 3 or 4 at most. Allow the oil temperature to recover fully between batches. This discipline produces evenly golden, crispy kroket every single time.
4. Skipping the Freeze Before Breading
After shaping the kroket, a quick 30-minute freeze makes all the difference. The brief time in the freezer firms the surface of each croquette, which helps the flour stick uniformly and the egg coat evenly. Without this step, the ragout may smear and create bare patches in the breading where the filling can leak through.
Frequently Asked Questions
What is a Dutch kroket?
A Dutch kroket is a deep-fried croquette filled with a thick, creamy beef ragout. The filling starts with slow-braised beef that is shredded and mixed into a roux-based sauce. After chilling until firm, the mixture is shaped into cylinders, coated in a double layer of breadcrumbs, and fried until golden and crispy. Kroket ranks among the most popular snacks in the Netherlands. You can find them in vending machines, lunch counters, and restaurants across the country.
What is the difference between kroket and bitterballen?
Both kroket and bitterballen use the same beef ragout filling and breading technique. The only difference is the shape. Kroket are rolled into long cylinders about 4 inches in length, while bitterballen are formed into small round balls roughly 1.5 inches across. Kroket are typically eaten on their own or in a bread roll, whereas bitterballen are served as bar snacks with mustard for dipping. The taste and texture are identical.
Can I make kroket ahead of time?
Absolutely. Kroket are one of the best make-ahead snacks you can prepare. The ragout filling can be made and refrigerated up to 2 days before shaping. Once breaded, the unfried kroket freeze beautifully for up to 3 months. Simply fry them directly from frozen, adding about one extra minute to the cooking time. This makes kroket an ideal party snack, since all the hard work happens days before your guests arrive.
Why did my kroket burst open during frying?
Kroket burst for three main reasons. First, the filling may not have been chilled long enough, leaving it soft and prone to expanding. Second, the breading may have had thin spots or cracks where steam could escape. Third, the oil temperature may have been too high, causing rapid steam buildup inside. Ensure the ragout is completely firm, apply a thorough double breading, and maintain the oil at a steady 350 degrees Fahrenheit.
What oil is best for frying kroket?
Vegetable oil, peanut oil, or sunflower oil are your best options for frying kroket. These neutral oils have high smoke points and will not interfere with the delicate beef flavor of the filling. Avoid using olive oil, which has a lower smoke point and adds an unwanted fruity taste. Use enough oil so the kroket float freely and cook evenly on all sides.
Can I bake kroket instead of frying?
You can bake kroket at 400 degrees Fahrenheit for 20 to 25 minutes, turning them once halfway through. A light spray of cooking oil before baking helps the breadcrumbs brown. However, baked kroket will not achieve the same shattering crispness as deep-fried versions. The texture is decent but noticeably different. For the most authentic Dutch experience, deep frying remains the strongly recommended method.
Variations and Adaptations
Satay Kroket:
This Indonesian-Dutch fusion fills the kroket with a peanut satay ragout instead of beef. Replace the beef with chicken and stir peanut butter, sambal oelek, and a squeeze of lime into the roux. The result is a spicy, nutty croquette that reflects the strong Indonesian influence on Dutch cuisine. Satay kroket are hugely popular at Dutch snack bars across the country.
Shrimp Kroket (Garnaalkroket):
A Belgian specialty that has crossed into Dutch cuisine, the shrimp kroket uses tiny North Sea gray shrimp folded into a creamy bechamel. The filling is lighter and more delicate than the beef version. It is traditionally served with fried parsley and a lemon wedge. Finding authentic gray shrimp outside of Europe can be challenging, but small bay shrimp make a reasonable substitute.
Vegetarian Mushroom Kroket:
Swap the beef for a mixture of finely chopped cremini and shiitake mushrooms sauteed with thyme and a splash of white wine. Use vegetable broth in the roux instead of beef broth. The mushrooms provide deep umami flavor that rivals the meatiness of the original. Add a touch of truffle oil for an extra luxurious variation that impresses at dinner parties.
The Cultural Significance of Kroket
In the Netherlands, kroket occupies a unique place that no other food quite matches. It is simultaneously high and low, casual and celebrated. Office workers grab a kroket from a FEBO wall vending machine during lunch breaks. Meanwhile, the same croquette appears on tasting menus at Michelin-starred restaurants in Amsterdam. This duality defines its cultural role. Kroket belongs to everyone.
The FEBO automaat deserves special mention. These bright yellow vending machine walls are a Dutch invention dating to the 1960s. You drop a coin in the slot, open a small glass door, and pull out a freshly fried kroket. No cashier, no wait. The automaat became an icon of Dutch efficiency and accessibility. Even today, tourists photograph these machines as symbols of Netherlands food culture.
Beyond convenience, kroket carries memories. Nearly every Dutch person can recall eating their first broodje kroket, that warm croquette nestled in a soft bread roll during a school lunch or family outing. The dish connects generations. Grandmothers pass down their ragout recipes, arguing over the proper ratio of nutmeg to pepper. Families debate whether beef or veal makes the superior filling. These conversations happen at kitchen tables across the Netherlands, and they are part of what makes kroket more than just a snack. It is edible heritage.
Conclusion
This kroket recipe gives you the complete roadmap to making authentic Dutch croquettes from scratch. The process takes time, but every step is straightforward. Braise the beef until tender, build a thick ragout, chill it firm, shape and bread with care, and fry until golden. The reward is a snack that cracks open to reveal a molten, savory filling unlike anything you can buy frozen.
Once you master the basic beef kroket, the variations are endless. Try satay, shrimp, or mushroom fillings to expand your repertoire. Make a double batch and freeze half for effortless entertaining later. However you serve them, these croquettes will earn their place as a favorite in your kitchen. The crispy, creamy combination is simply irresistible.
Looking for more hearty European comfort food? Explore our full collection of European dishes, including Dutch stamppot, German bratwurst, and French beef bourguignon. Each recipe brings the same level of detail and tested technique to help you cook with confidence.