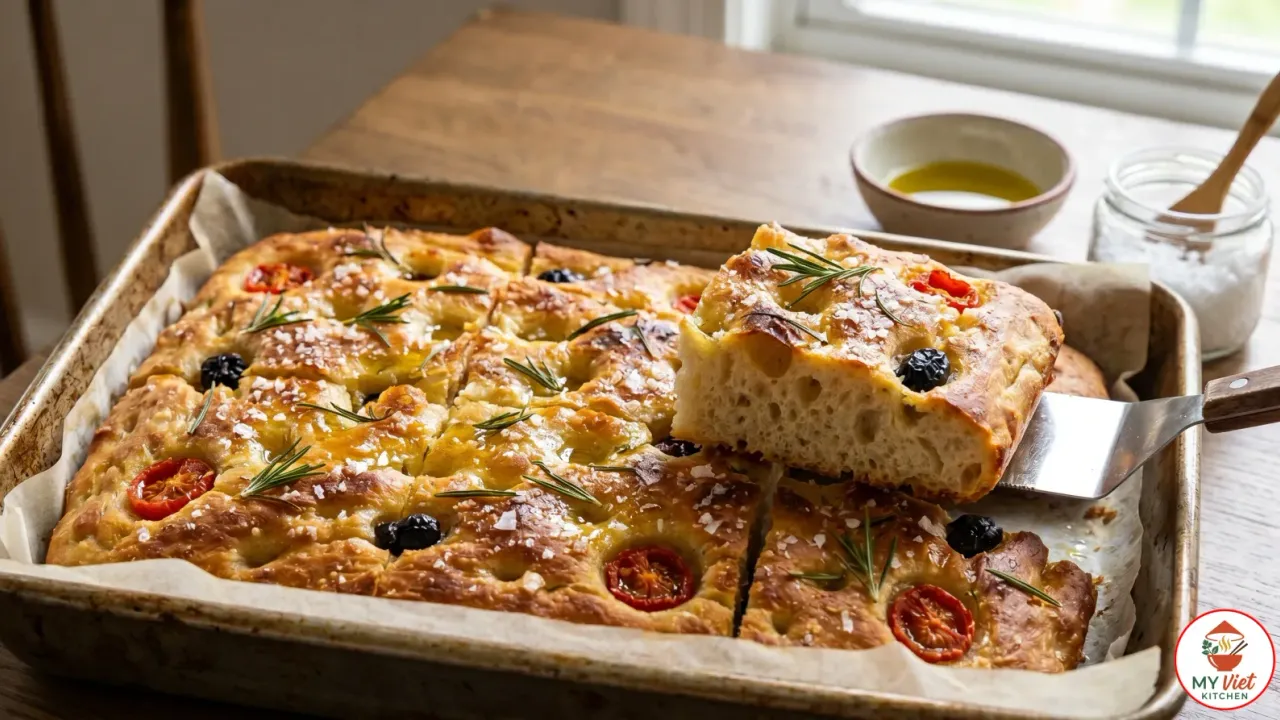
Focaccia is the golden Italian flatbread that captures everything beautiful about Mediterranean baking in a single pan. This focaccia recipe guides you through every step, from mixing a simple dough to pressing those iconic dimples and baking it until the olive oil crust turns gloriously crisp. With just flour, water, yeast, salt, and generous amounts of extra virgin olive oil, you can produce a bread that rivals any Italian bakery.
Prep Time: 20 minutes | Cook Time: 25 minutes | Total Time: 2 hours 45 minutes (including rising) | Servings: 8
Difficulty: Easy | Calories: ~280 per serving
What Makes Focaccia Special?
The magic of focaccia lies in its paradox of simplicity and depth. The ingredient list is almost laughably short: flour, water, yeast, salt, and olive oil. Yet this humble combination produces a bread with a golden, crispy bottom, a pillowy interior full of open air pockets, and a top glistening with pools of fragrant oil. No other bread achieves this particular combination of textures with so few components. A great focaccia recipe respects this simplicity and lets each ingredient shine.
What sets focaccia apart from other flatbreads is the extraordinary amount of olive oil worked into and onto the dough. While most bread recipes call for a tablespoon or two of fat, focaccia practically bathes in it. The oil coats the dough during rising, pools in the dimples during baking, and essentially fries the bottom crust in the pan. This is why a properly made focaccia has a golden, almost cracker-like base that gives way to a soft, airy crumb within. Furthermore, the olive oil contributes a fruity, peppery flavor that permeates every bite.
Italian bakers have perfected this bread over centuries, and regional versions span the entire peninsula. In Genoa, where focaccia originated, bakeries sell it by weight throughout the day. Workers grab slices for breakfast, children eat it as an after-school snack, and families tear it apart at dinner. Indeed, focaccia is not a special-occasion bread in Italy. It is everyday sustenance, and that ordinariness is part of its charm. When something this simple brings this much pleasure, it earns a permanent place in the kitchen.
Choosing the Right Flour for Your Focaccia Recipe
Flour is the backbone of any bread, and your choice directly affects the texture of the finished focaccia. The protein content in the flour determines how much gluten develops, which in turn controls the chewiness and structure of the crumb. Below are the best options for any focaccia recipe baked at home.
- Bread flour (best choice): With a protein content of 12 to 14 percent, bread flour produces the ideal chewy yet airy crumb. It absorbs more water than other flours, which allows you to make a wetter dough. That extra hydration creates the large, open air pockets that define great focaccia. As a result, bread flour consistently delivers the best texture.
- All-purpose flour: A perfectly acceptable alternative with 10 to 12 percent protein. The focaccia will be softer and more tender, with a slightly tighter crumb. If you use all-purpose flour, reduce the water by 1 to 2 tablespoons because it absorbs less liquid. Many home bakers prefer this option since all-purpose flour is always on hand.
- Italian Tipo 0 or Tipo 00 flour: These finely milled Italian flours create a delicate, tender focaccia with a lighter texture. Tipo 0 works especially well because its protein content sits between all-purpose and bread flour. However, Tipo 00 has lower protein and may produce a flatter result unless you handle the dough carefully. These flours are worth trying if you want an authentic Italian character.
Ingredients for Focaccia
Dough:
- 4 cups (500g) bread flour
- 2 teaspoons (7g) instant yeast
- 2 teaspoons fine sea salt
- 1 tablespoon honey or granulated sugar
- 1 3/4 cups (420ml) warm water (100-110°F / 38-43°C)
- 2 tablespoons extra virgin olive oil
For the Pan and Topping:
- 1/3 cup (80ml) extra virgin olive oil, divided
- 2 tablespoons fresh rosemary leaves
- 1 teaspoon flaky sea salt (such as Maldon or Jacobsen)
Optional Toppings:
- Cherry tomatoes, halved
- Pitted olives (Kalamata or Castelvetrano)
- Thinly sliced red onion
- Roasted garlic cloves
- Grated Parmesan cheese
Pro tip: Use the best extra virgin olive oil you can afford. Since focaccia uses so much of it, the flavor of the oil comes through directly in the finished bread. A fruity, peppery oil will give you a noticeably better result than a bland, refined one. In any focaccia recipe, olive oil quality truly matters.
Step-by-Step Focaccia Recipe Instructions
Step 1: Mix the Dough
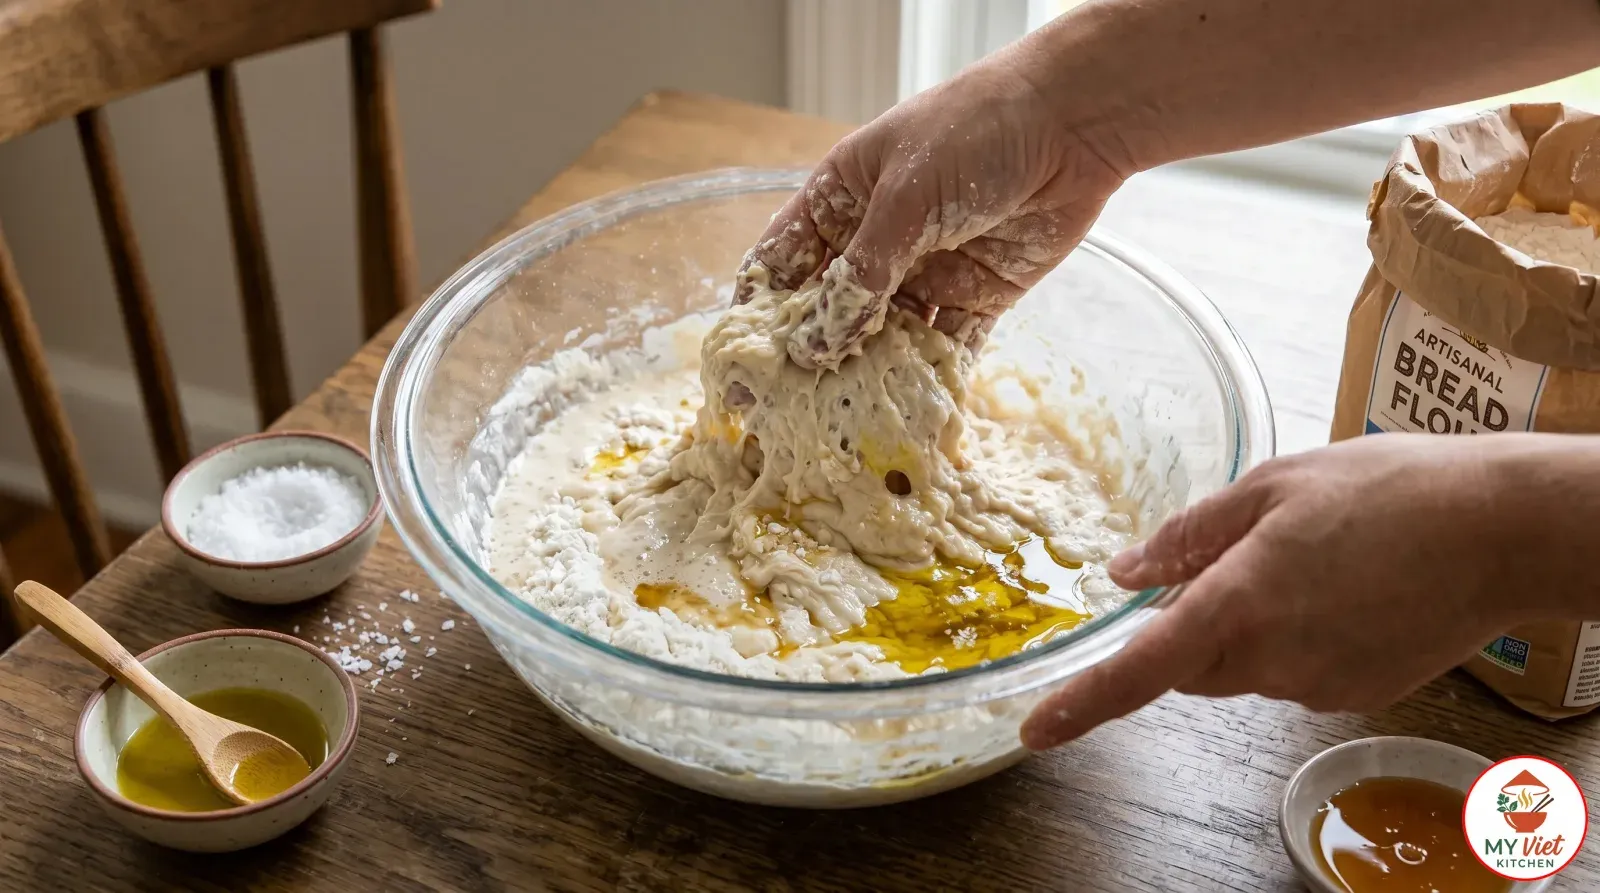
1 Combine the bread flour, instant yeast, honey, and fine sea salt in a large mixing bowl. Pour in the warm water and 2 tablespoons of olive oil. Stir everything together with a wooden spoon or dough whisk until a shaggy, sticky mass forms and no dry flour remains. The dough should look rough and wet. Do not worry about it being messy, because this high hydration is exactly what creates those beautiful open air pockets in the finished bread.
Unlike many bread recipes, focaccia does not require kneading. The long rising time handles gluten development for you. Simply stir until the ingredients come together, then stop. Overworking the dough at this stage can make it tough. Furthermore, the sticky texture is a sign that you have the right ratio of water to flour. If the dough looks dry or stiff, add a tablespoon of water at a time until it feels loose and tacky.
Step 2: First Rise
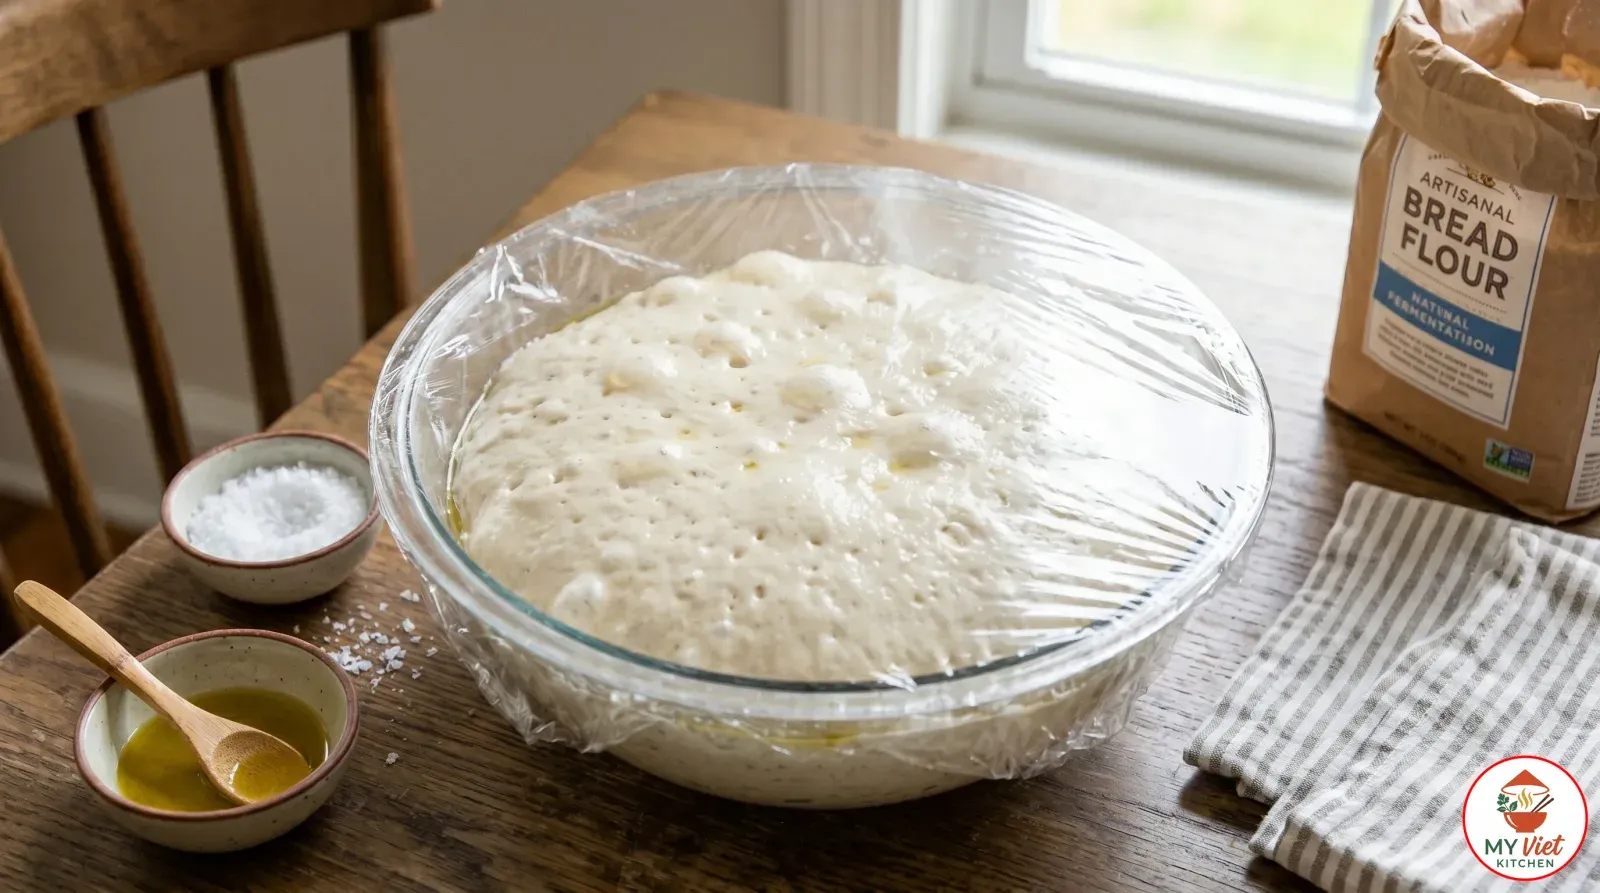
2 Drizzle a thin layer of olive oil over the dough and turn it once to coat the surface. Then cover the bowl tightly with plastic wrap or a damp kitchen towel. Let the dough rise at room temperature for 1 to 1.5 hours until it doubles in size. The surface should look puffy and dotted with bubbles, which indicates that the yeast is active and producing gas.
For deeper, more complex flavor, you can cold-ferment the dough instead. After the initial mix, place the covered bowl directly in the refrigerator for 12 to 24 hours. Cold fermentation slows the yeast down, which allows organic acids and alcohols to build up in the dough. These byproducts give the bread a subtle tanginess and a more nuanced flavor profile. When ready to use, pull the dough from the fridge and let it sit at room temperature for 30 minutes before proceeding. Many professional bakers consider this overnight method the secret to truly exceptional focaccia.
Step 3: Oil the Pan and Stretch the Dough
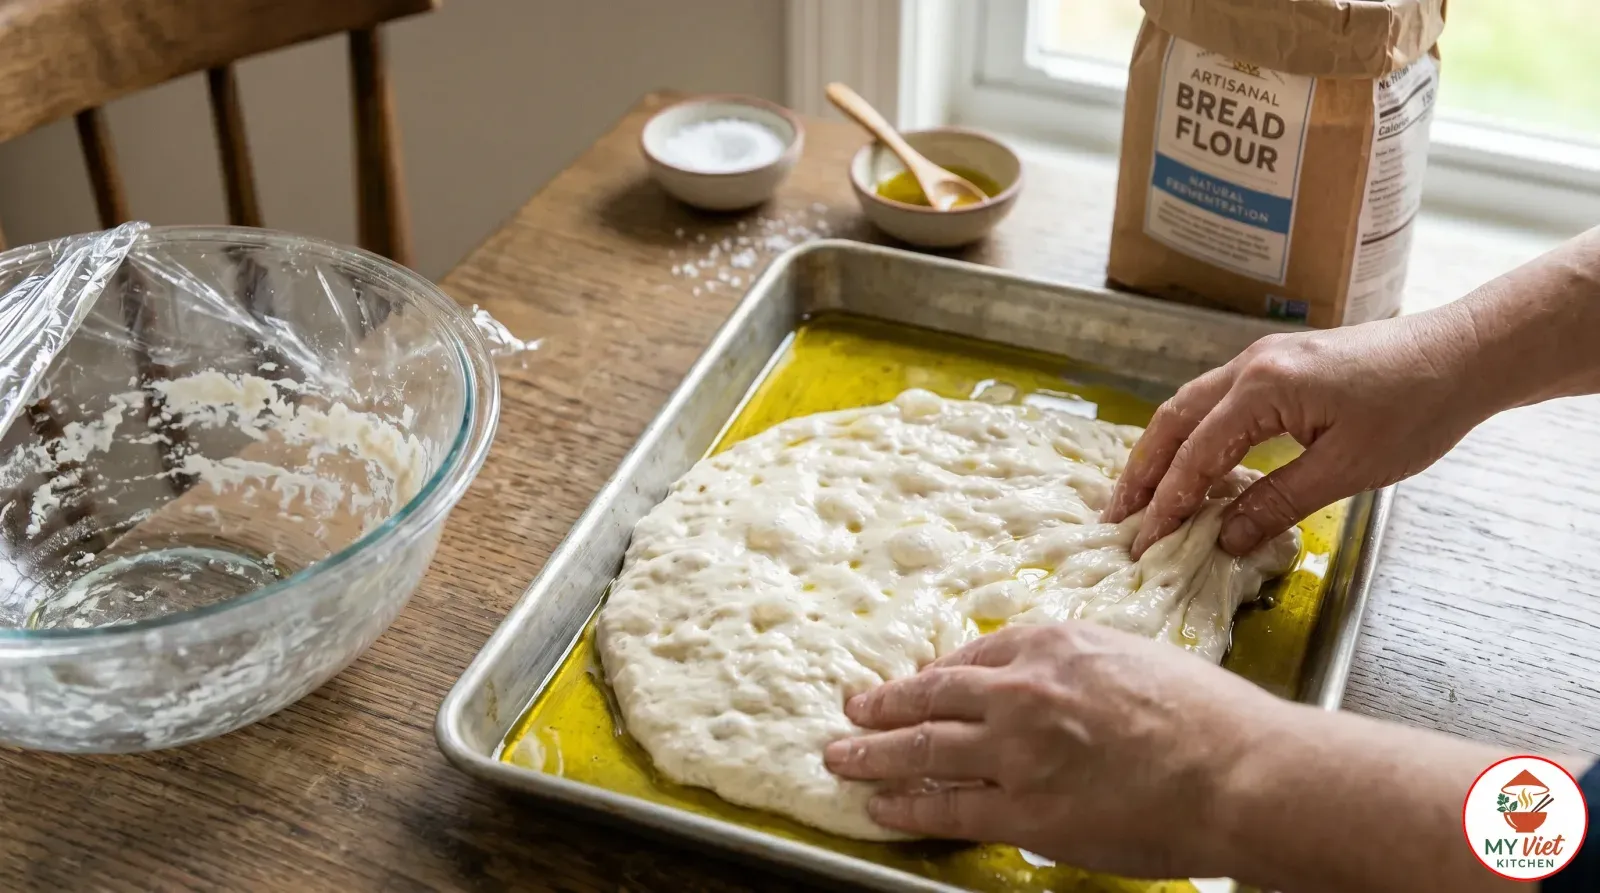
3 Pour about 3 tablespoons of olive oil into a 9x13-inch rimmed baking sheet. Tilt the pan to spread the oil across the entire bottom and partway up the sides. Then gently transfer the risen dough onto the oiled pan. Using oiled fingertips, press and stretch the dough toward the corners of the pan. Work gently to avoid deflating the air bubbles that formed during rising.
The dough will likely spring back and refuse to fill the pan completely on the first try. This resistance is the gluten fighting you, and it is completely normal. Simply let the dough rest for 10 minutes, then stretch again. After one or two rest periods, the gluten relaxes enough for the dough to reach the edges. Patience here pays off with a bread that bakes evenly across the entire pan. Additionally, the generous oil on the pan serves a critical purpose. It essentially shallow-fries the bottom of the focaccia during baking, producing that signature golden, crispy base.
Step 4: Second Rise and Create the Dimples
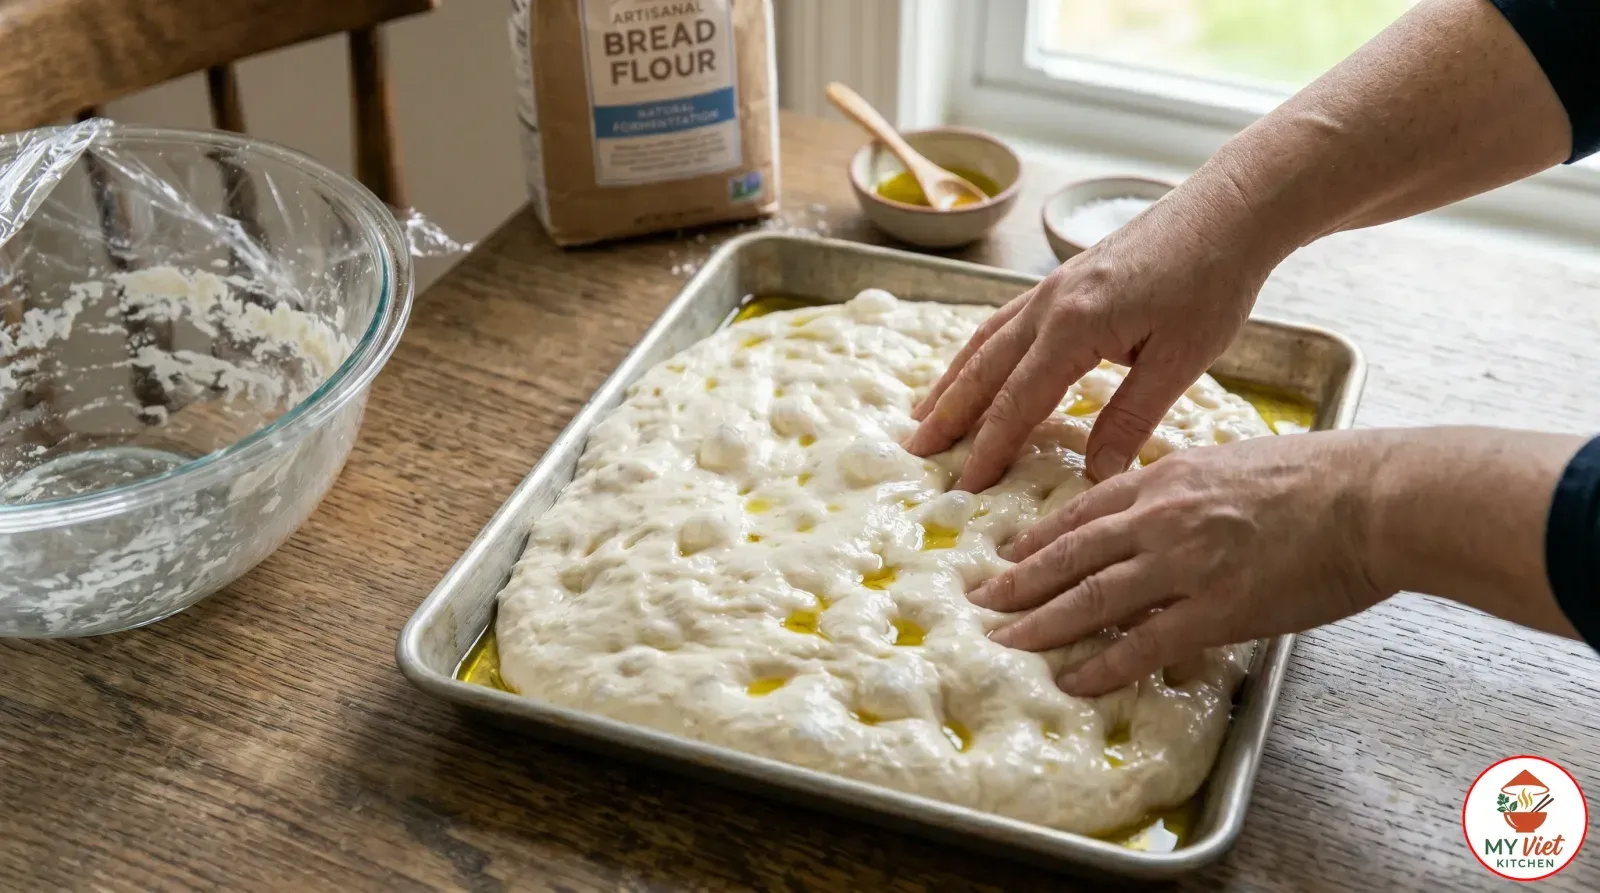
4 Cover the pan loosely with plastic wrap or a damp towel and let the dough rise for another 30 to 45 minutes. It should look visibly puffy and fill the pan. Now comes the most satisfying part of making focaccia. Dip your fingers in olive oil and press them firmly into the dough, all the way down to the bottom of the pan. Create dimples across the entire surface, spacing them about an inch apart.
These dimples are not just decorative. They serve several important purposes. First, they create pockets that hold pools of olive oil during baking, which flavors the bread from within. Second, they prevent the dough from rising into a uniform dome, keeping the bread flat and even. Third, they give the surface that characteristic landscape of peaks and valleys that makes focaccia so visually appealing. Press deep and deliberate. Timid dimpling produces a boring, flat surface instead of the dramatic texture you want.
Step 5: Add the Toppings
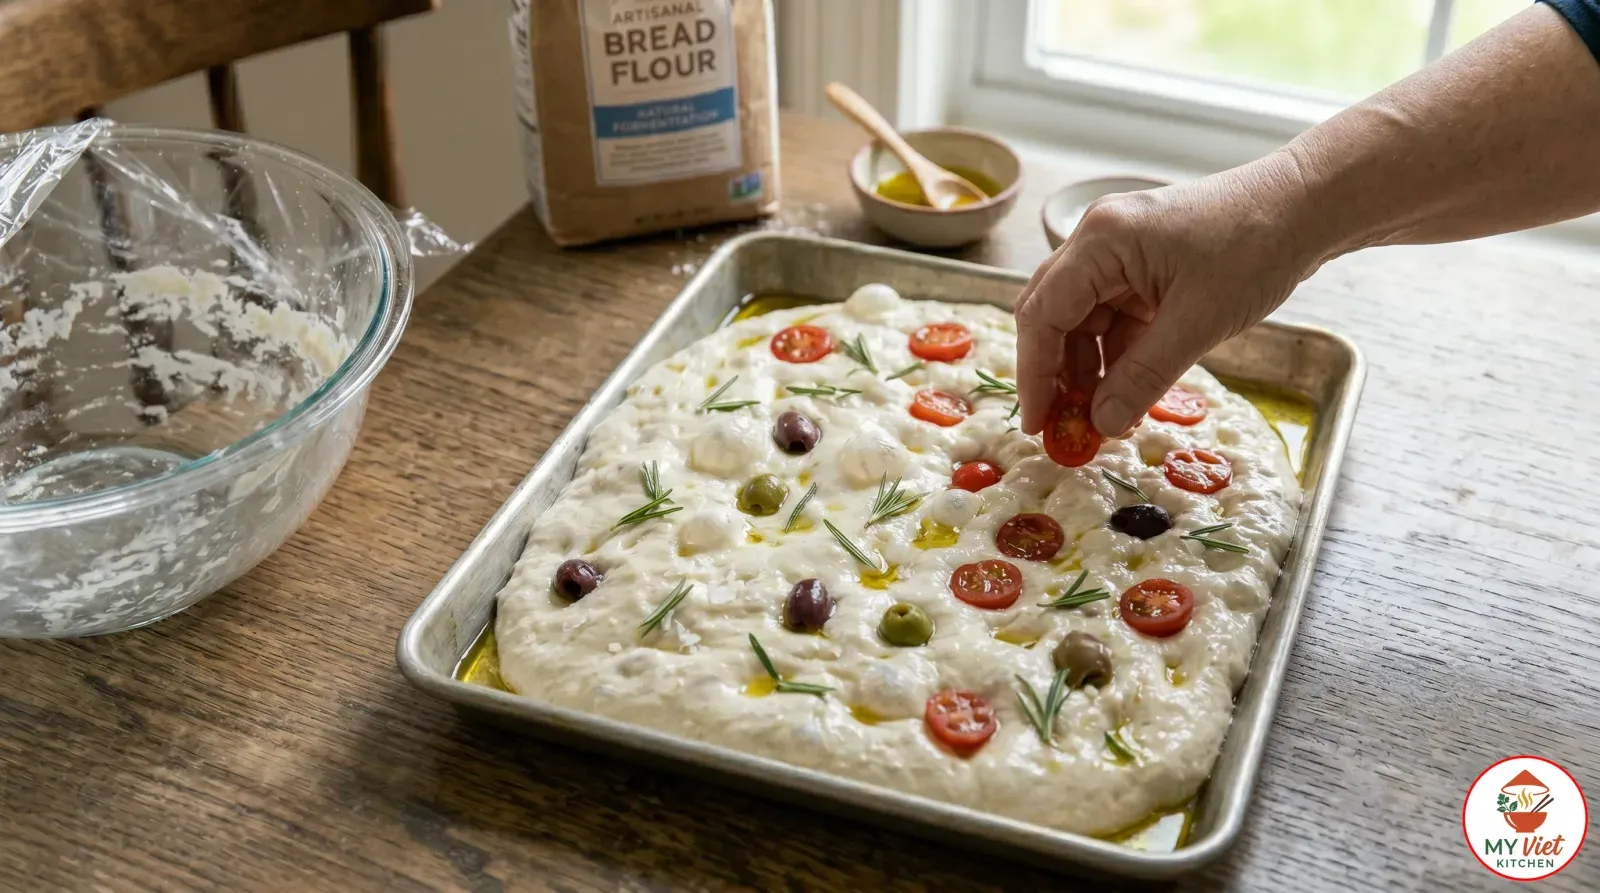
5 Drizzle the remaining olive oil generously over the dimpled surface. The oil should pool in the dimples and coat the raised areas. Then scatter fresh rosemary leaves evenly across the dough, pressing them gently into the surface. Finish with a generous sprinkle of flaky sea salt. The coarse salt crystals add bursts of salinity that contrast beautifully with the rich, oily bread.
If you are using additional toppings like cherry tomatoes, olives, or sliced onion, press them gently into the dimples now. Keep toppings light on this first bake. Heavy toppings can weigh down the dough and prevent it from rising properly in the oven. A few well-placed ingredients always look and taste better than an overloaded surface. Moreover, toppings that release moisture, such as tomatoes, should be patted dry first to avoid soggy spots.
Step 6: Bake Until Golden
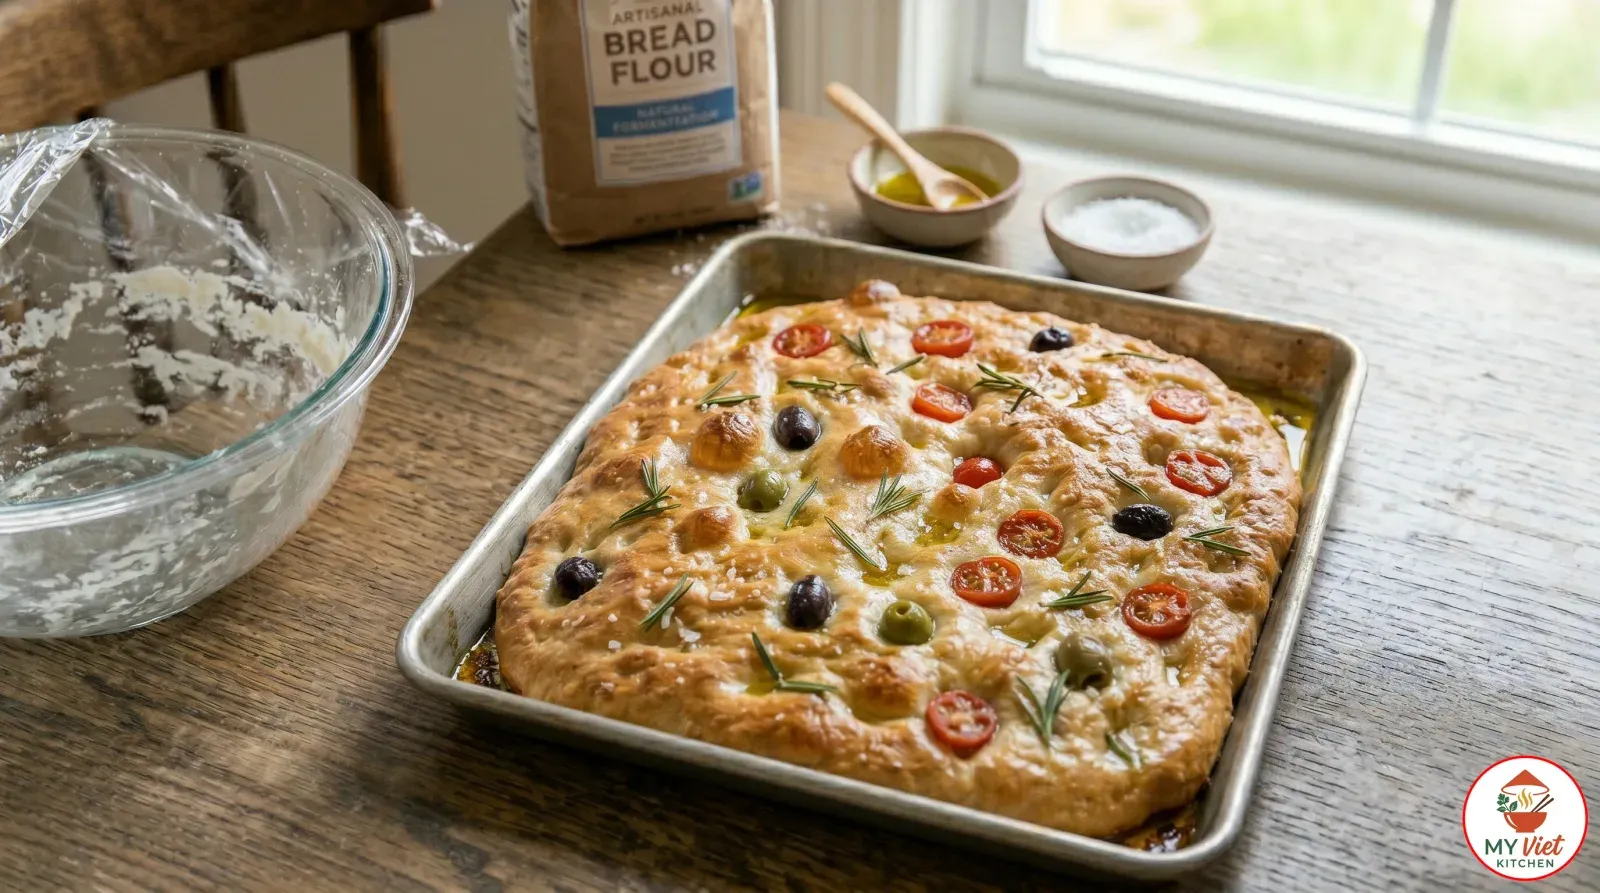
6 Preheat your oven to 425 degrees Fahrenheit (220 degrees Celsius). Place the pan on the middle rack and bake for 22 to 25 minutes. The focaccia is done when the top turns deeply golden brown and the edges pull slightly away from the pan. You can also lift a corner with a spatula to check that the bottom is crispy and golden, not pale or soft.
Remove the pan from the oven and immediately drizzle one final thread of olive oil over the hot surface. This last drizzle soaks into the bread and adds a fresh, fruity finish. Let the focaccia cool in the pan for 5 minutes to allow the bottom crust to firm up. Then transfer it to a wire rack. Cutting into the bread too early releases steam and can make the interior gummy. Therefore, wait at least 10 minutes before slicing. The aroma while it cools is one of the great rewards of home baking.
Expert Tips for Perfect Focaccia
Water Temperature Matters
The water you use to activate the yeast should be between 100 and 110 degrees Fahrenheit (38-43 degrees Celsius). Water that is too cold slows yeast activity and extends the rising time dramatically. Water that is too hot, above 120 degrees, kills the yeast outright. If you do not have a thermometer, the water should feel warm but comfortable on your wrist. Getting this temperature right is the single most important factor in any focaccia recipe.
Do Not Skimp on Olive Oil
Many home bakers reduce the olive oil because the amount seems excessive. Resist that urge. The generous oil is what makes focaccia taste like focaccia. It fries the bottom crust golden, keeps the interior moist for days, and delivers that distinctive Mediterranean flavor. Using too little oil produces a bread that tastes like a plain dinner roll. Consequently, follow this focaccia recipe precisely and use high-quality extra virgin olive oil for the best flavor.
Trust the Sticky Dough
Focaccia dough should be noticeably wetter and stickier than standard bread dough. This high hydration is not a mistake. It is what creates the open, airy crumb full of irregular holes. Resist the urge to add extra flour during mixing. Instead, oil your hands when handling the dough. The stickiness resolves during the long rising process as gluten develops and gives the dough structure. Trust this focaccia recipe and you will be rewarded with a light, pillowy result.
Regional Italian Focaccia Styles Compared
Italy has no single focaccia. Every region bakes its own version, and the differences are striking. Understanding these styles helps you appreciate how versatile this bread truly is. Here is how the major regional varieties compare.
| Regional Style | Origin | Key Features | Texture |
|---|---|---|---|
| Focaccia Genovese | Genoa, Liguria | Thin, lots of olive oil, light salt | Crispy outside, soft and oily inside |
| Focaccia di Recco | Recco, Liguria | Two thin layers with stracchino cheese | Crackly, paper-thin crust |
| Focaccia Barese | Bari, Puglia | Topped with tomatoes, olives, and onions | Thick, bread-like, and hearty |
| Focaccia di Voltri | Voltri, Liguria | Extremely thin, almost transparent | Crispy throughout, nearly cracker-like |
| Focaccia Messinese | Messina, Sicily | Stuffed with escarole, tomatoes, anchovies | Thick, filled, and substantial |
Serving Suggestions
Focaccia is remarkably versatile at the table. Italians serve it as an appetizer, a side bread, a sandwich vehicle, and even a snack on its own. The olive oil richness pairs naturally with a wide range of flavors. Below are the best ways to enjoy this focaccia recipe once it comes out of the oven.
The Perfect Accompaniments:
- Soup dipper: Tear focaccia into pieces and serve alongside French onion soup or a classic Italian minestrone. The bread soaks up broth beautifully, and the olive oil crust holds its structure without turning to mush.
- Sandwich bread: Slice focaccia horizontally and fill it with prosciutto, fresh mozzarella, roasted peppers, and arugula. The oily, herbed crust adds flavor that plain sandwich bread simply cannot match.
- Antipasto platter: Cut focaccia into squares and arrange them on a board alongside cured meats, marinated olives, and aged cheeses. It anchors the platter and gives guests something hearty to build bites with.
- Pasta companion: Serve warm focaccia slices next to a plate of carbonara or a rich tomato-based pasta. The bread is perfect for mopping up leftover sauce.
Beverage Pairings:
- Vermentino or Pinot Grigio: These crisp, dry Italian white wines complement the olive oil richness of focaccia without overwhelming it. Their bright acidity refreshes the palate between bites.
- Light red wine (Barbera or Chianti): A medium-bodied Italian red pairs beautifully when the focaccia has savory toppings like olives or tomatoes. The wine’s fruit and tannins balance the salt and fat.
- Sparkling water with lemon: A simple, refreshing choice that cleanses the palate and lets the bread’s flavor shine. This is the most common pairing in Italian homes and bakeries.
- Espresso: In Liguria, locals often enjoy a slice of focaccia with morning espresso. The combination of salty, oily bread and bitter coffee is surprisingly addictive.
Storage and Reheating
Room temperature: Wrap cooled focaccia tightly in plastic wrap or place it in an airtight container. It stays fresh for up to 2 days at room temperature. The olive oil content helps keep the crumb moist longer than most breads. However, the crispy crust softens after the first day, so eat it fresh for the best texture.
Freezer: Focaccia freezes exceptionally well for up to 3 months. Wrap individual slices or the whole bread tightly in plastic wrap, then in aluminum foil. Thaw at room temperature for 1 to 2 hours before reheating. The bread retains its flavor and texture remarkably well after freezing.
Reheating: The best method is a 350-degree Fahrenheit oven for 8 to 10 minutes. This restores the crispy crust without drying out the interior. You can also place slices in a dry skillet over medium heat for 2 to 3 minutes per side. Avoid the microwave, as it makes the bread rubbery and steamy. For the closest to fresh-baked results, brush the surface lightly with olive oil before reheating in the oven.
Common Mistakes to Avoid
1. Using Cold or Dead Yeast
Yeast loses potency over time, especially once the package is opened. If your dough does not rise after an hour, the yeast was likely expired or the water temperature killed it. Always check the expiration date on your yeast before starting. You can test yeast by dissolving it in warm water with a pinch of sugar. If it foams within 10 minutes, it is active and ready to use.
2. Adding Too Much Flour
The most common mistake is adding extra flour because the dough feels too sticky. Focaccia dough is supposed to be sticky. That high moisture content is what creates the airy, open crumb. Adding flour produces a dense, heavy bread that tastes more like a dinner roll. Instead of adding flour, oil your hands and work surfaces. Let the rising process do the work of making the dough manageable.
3. Rushing the Rise
Focaccia needs time. The first rise should take at least 1 hour, and the second rise needs another 30 to 45 minutes. Cutting these times short means the dough has not developed enough gas or gluten. As a result, the bread comes out flat, dense, and chewy in the wrong way. If your kitchen is cold, place the bowl near a warm oven or in a microwave with a cup of hot water. Warmth speeds up yeast activity without sacrificing quality.
4. Timid Dimpling
Gentle pokes barely dent the surface and disappear during baking. Press your fingers firmly through the dough until you feel the bottom of the pan. These deep dimples hold olive oil, create texture, and prevent the bread from ballooning up unevenly. Oil your fingers first so they slide in cleanly without tearing the dough. Bold, confident dimples are the hallmark of authentic focaccia.
Frequently Asked Questions
What is the difference between focaccia and pizza dough?
Focaccia dough contains significantly more olive oil than pizza dough, which gives it a richer flavor and a softer, more bread-like texture. Pizza dough is stretched thin and baked at very high heat for a crispy, charred base. Focaccia, on the other hand, is thicker and baked at a moderate temperature. The generous oil in focaccia essentially fries the bottom crust, creating a golden finish that pizza does not have. While you can adapt one dough for the other, the results taste quite different.
Can I make focaccia without a stand mixer?
Yes, and many bakers actually prefer it that way. Focaccia requires no kneading at all. Simply stir the ingredients together with a wooden spoon until a shaggy dough forms. The long rising time develops the gluten structure naturally, so a mixer is unnecessary. In fact, overmixing in a stand mixer can make the dough too tight and reduce the airiness. A bowl and a spoon are all you need.
Why is my focaccia dense and not fluffy?
Dense focaccia usually results from one of three problems: expired yeast, water that was too hot, or insufficient rising time. The dough must double in size during the first rise and look visibly puffy after the second. Additionally, using too much flour creates a heavy crumb. Make sure your yeast is fresh, your water temperature stays between 100 and 110 degrees Fahrenheit, and you give the dough enough time to rise fully.
How long does homemade focaccia stay fresh?
Focaccia stays fresh at room temperature for up to 2 days when stored in an airtight container or wrapped tightly. The high olive oil content keeps the crumb moist longer than most breads. After 2 days, the texture begins to decline. For longer storage, freeze the bread for up to 3 months. Reheat frozen slices in a 350-degree oven for 10 minutes to restore the crispy crust.
Can I use all-purpose flour instead of bread flour?
All-purpose flour works well for focaccia, though the texture differs slightly. Bread flour has more protein, which creates a chewier crumb with better structure and larger air holes. All-purpose flour produces a softer, more tender result. If using all-purpose flour, reduce the water by 1 to 2 tablespoons because it absorbs less liquid. Both flours make a delicious focaccia recipe, so use what you have on hand.
Variations and Adaptations
Focaccia di Recco (Cheese-Filled):
This Ligurian specialty uses two extremely thin sheets of dough with creamy stracchino cheese melted between them. The result is a crackly, almost pastry-like bread with a gooey cheese center. Roll the dough as thin as possible for the best result. Bake at a higher temperature, around 475 degrees Fahrenheit, to get the top crispy before the cheese breaks through. This variation is completely different from standard focaccia and well worth trying.
Potato Focaccia:
Add 1 cup of mashed potato to the dough during mixing. The potato starch makes the crumb incredibly moist and tender, and the bread stays fresh even longer than the standard version. Top with thinly sliced raw potatoes, olive oil, and rosemary before baking. This hearty variation is popular in Puglia and makes a satisfying meal on its own.
Grape Focaccia (Schiacciata con l’Uva):
This Tuscan harvest bread embeds wine grapes directly into the dough with sugar and olive oil. The grapes burst during baking, creating pockets of jammy sweetness throughout the bread. It is traditionally made in September during the grape harvest. Use seedless red or black grapes as a substitute if wine grapes are unavailable. The combination of sweet fruit, salty dough, and olive oil is extraordinary.
Gluten-Free Focaccia:
Replace the bread flour with a 1:1 gluten-free flour blend that contains xanthan gum. Increase the olive oil by 2 tablespoons and add an extra egg to help with binding and structure. The texture will be slightly denser than the wheat version, but the olive oil richness still delivers excellent flavor. Allow a longer second rise, about 45 to 60 minutes, because gluten-free doughs need more time to develop volume.
The Cultural Significance of Focaccia
The history of focaccia stretches back to ancient Rome, where a flatbread called panis focacius was baked on the hearth. The Latin word focus means “hearth” or “fireplace,” and this etymological root tells us that focaccia was among the earliest oven-baked breads in Western civilization. Roman soldiers carried versions of it as portable sustenance, and the basic concept of oiled flatbread spread throughout the Mediterranean as the empire expanded.
In modern Italy, focaccia holds a special place in the culture of Liguria, particularly in and around Genoa. Ligurian bakeries, called panifici, start producing focaccia before dawn. By morning, the smell of baking olive oil and bread fills the narrow streets. Locals buy it warm, wrapped in paper, and eat it on the way to work. Children receive slices at school, and families bring it to the beach. It is not treated as something precious or formal. Instead, it is woven into the fabric of daily life, and that deep ordinariness speaks to how fundamental this bread is to the Italian culinary identity.
Beyond Italy, focaccia has become one of the most popular artisan breads worldwide. Bakeries from San Francisco to Sydney feature their own interpretations. The bread’s adaptability is part of its global success. It welcomes almost any topping, fits any meal, and requires no special equipment. Moreover, focaccia connects modern home bakers to a tradition that is literally thousands of years old. Every time you press your fingers into that oily dough, you are repeating a gesture that bakers have made since the days of the Roman Republic.
Conclusion
This focaccia recipe proves that world-class bread does not require complicated techniques or exotic ingredients. Master the wet dough, give it time to rise, press bold dimples into the surface, and let generous olive oil do the rest. The result is a golden, fragrant flatbread with a crispy base, a pillowy interior, and the unmistakable taste of the Mediterranean. Once you bake your first batch, you will understand why Italians have relied on this bread for centuries.
Looking for more beloved European recipes? Explore our European dishes collection for classics like panna cotta, tiramisu, and creme brulee. Each focaccia recipe and European classic features the same detailed, step-by-step approach to bring the world’s best food to your kitchen.