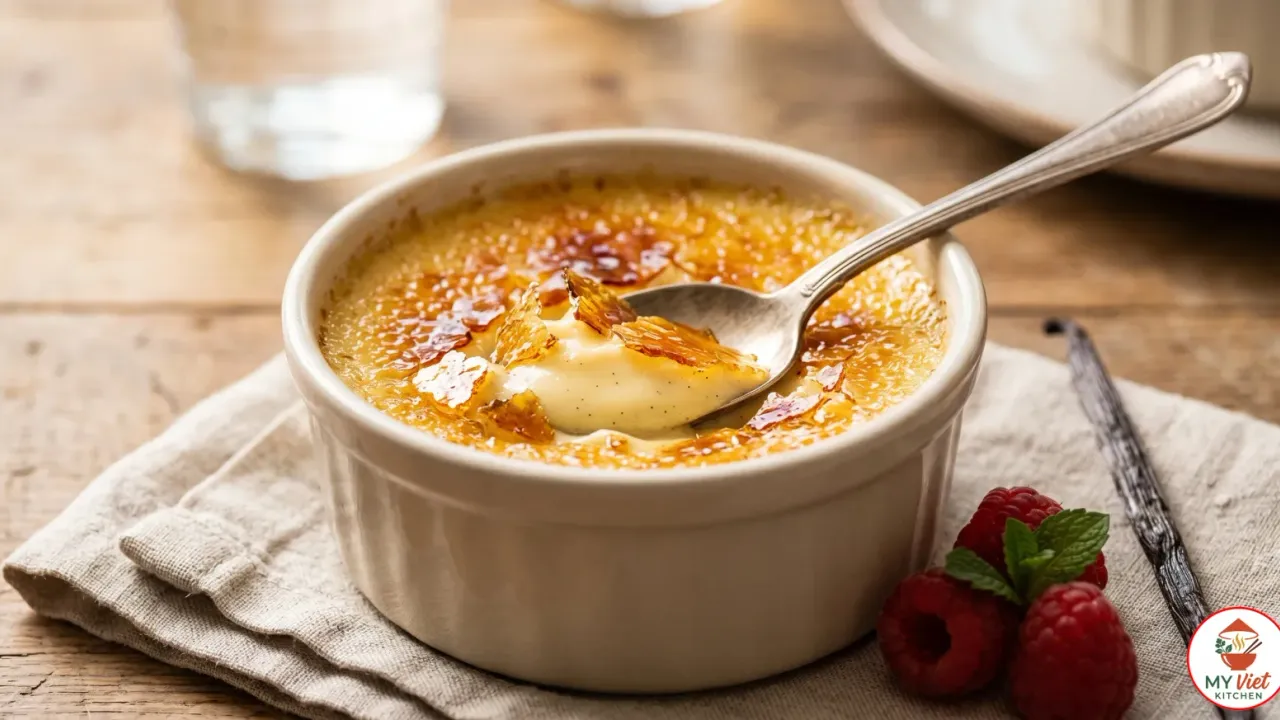
Creme brulee is the iconic French dessert that pairs silky vanilla custard with a thin, shattering layer of caramelized sugar. This creme brulee recipe walks you through every step, from infusing cream with real vanilla to torching the sugar topping into golden glass. With just five ingredients and a little patience, you can recreate this elegant bistro classic in your own kitchen.
Prep Time: 15 minutes | Cook Time: 45 minutes | Servings: 6
Difficulty: Medium | Calories: ~350 per serving
What Makes Creme Brulee Special?
The genius of creme brulee lives in the contrast between two textures. First, your spoon cracks through a brittle caramel shell. Then it sinks into cool, velvety custard beneath. No other dessert delivers this kind of dramatic tension in a single bite. Furthermore, the short list of ingredients hides how refined the final result truly is. You only need heavy cream, egg yolks, sugar, vanilla, and salt.
What separates a great creme brulee from a mediocre one is technique rather than complexity. First, the custard must bake gently in a water bath so the eggs set without curdling. Next, the cream must steep long enough to absorb deep vanilla flavor. Additionally, the sugar topping needs precise torching to get that amber, glass-like finish. Each step is simple on its own, but together they create something truly special.
French bistros have served this dessert for centuries, and its fame has only grown. Restaurants from Tokyo to New York put it on their menus because diners never tire of that crack. In fact, the fun moment of breaking through the sugar crust makes creme brulee as much a sensory event as a tasty one. Consequently, it remains one of the most loved desserts in the world.

Choosing the Right Vanilla
Vanilla is the soul of this dessert, so the type you choose matters greatly. In short, the quality of your vanilla defines the depth and warmth of the finished custard. Below are the best options for making creme brulee at home.
- Vanilla bean (best choice): A whole vanilla bean delivers the richest, most complex flavor. Simply split it lengthwise and scrape the tiny seeds into the cream. Those black specks are the hallmark of an authentic creme brulee. Besides that, the pod itself adds even deeper aroma during steeping.
- Pure vanilla extract: A reliable and affordable option that works well in this recipe. Use 2 teaspoons per batch. Also, add it after heating the cream to keep the flavor strong. The result is delicious, though you miss the visual appeal of vanilla bean specks.
- Vanilla bean paste: This thick paste combines the ease of extract with the seeds of a real bean. As a result, it gives you visible vanilla specks and a strong flavor. One tablespoon replaces one vanilla bean. Indeed, many pastry chefs consider this the best option for both quality and ease.
Ingredients for Creme Brulee
Custard Base:
- 2 cups (480ml) heavy cream
- 1 vanilla bean, split and scraped, or 2 teaspoons pure vanilla extract
- 5 large egg yolks
- 1/2 cup (100g) granulated sugar
- 1 pinch of fine sea salt
For the Caramelized Topping:
- 6 tablespoons granulated sugar (about 1 tablespoon per ramekin)
Equipment You Will Need:
- 6 shallow ramekins (6-ounce capacity)
- A deep baking dish or roasting pan
- A fine mesh sieve
- A kitchen torch (or oven broiler as backup)
Pro tip: Use heavy cream with at least 35% fat content. Light cream or half-and-half produces a thinner custard that lacks the luxurious mouthfeel that defines a proper creme brulee. The higher the fat content, the silkier and more stable the set.
Step-by-Step Instructions
Step 1: Infuse the Cream
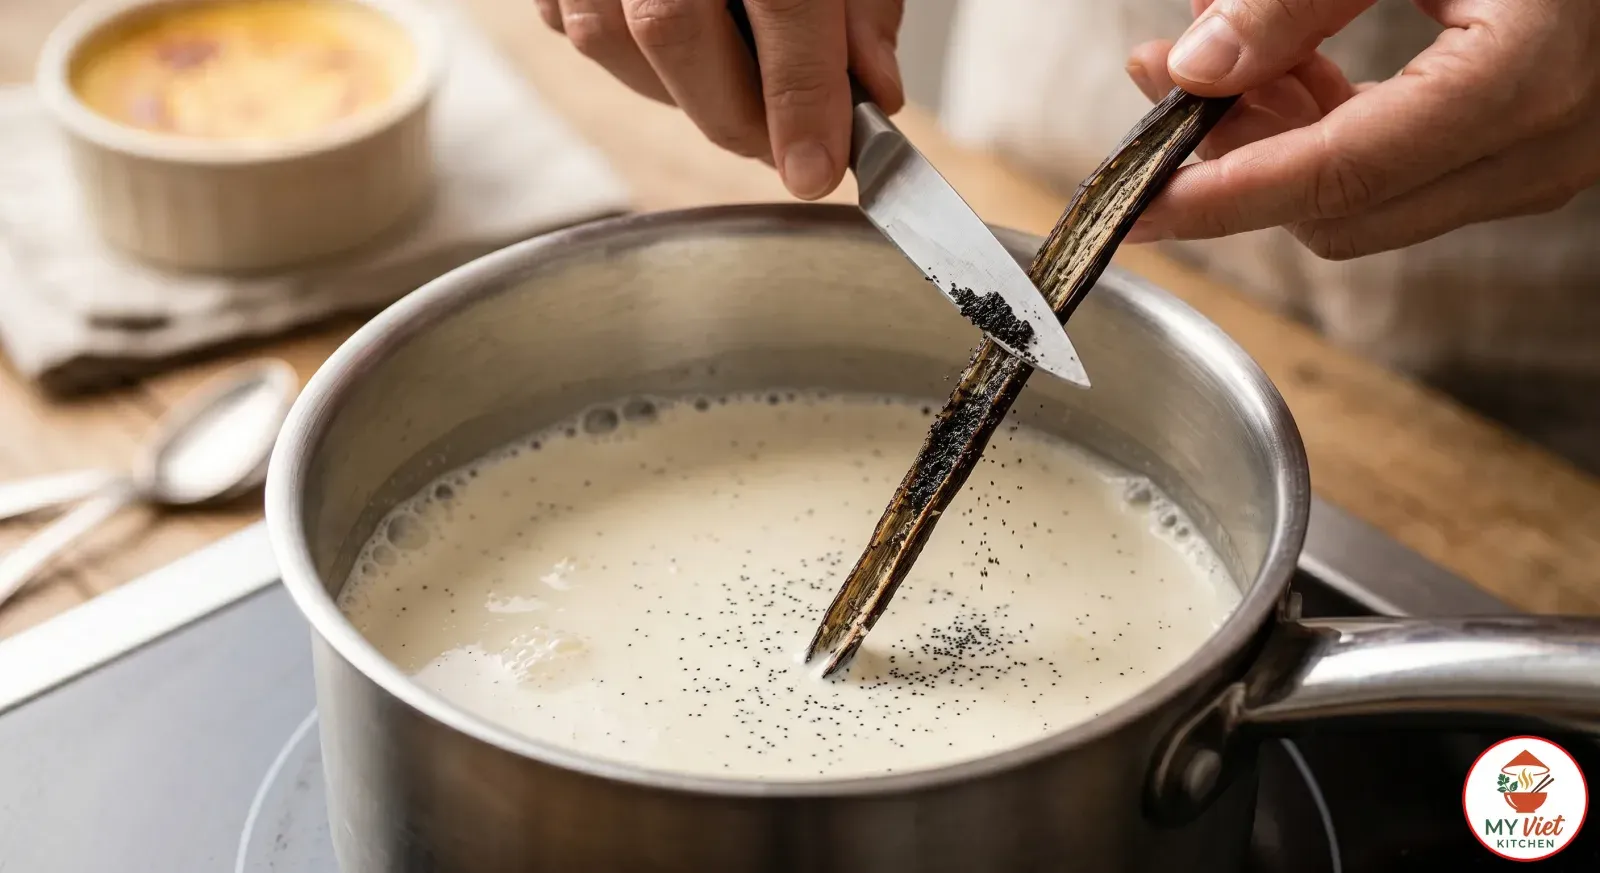
1 Pour the heavy cream into a medium saucepan. Split the vanilla bean lengthwise with a sharp knife and scrape the seeds into the cream. Drop the scraped pod into the saucepan as well. Then place the pan over medium heat and warm the cream until small bubbles appear around the edges. This is called scalding. Do not let the cream boil, because boiling changes its proteins and can make the texture grainy.
Next, remove the pan from the heat and let the vanilla steep for at least 15 minutes. This rest allows the vanilla to release its full range of flavor into the warm cream. If you use vanilla extract instead of a bean, skip the steeping and simply stir the extract in after the cream cools slightly. Moreover, you can infuse the cream overnight in the fridge for an even richer result.
Step 2: Prepare the Custard Base
2 Preheat your oven to 325 degrees Fahrenheit (165 degrees Celsius). In a large bowl, whisk together the egg yolks, sugar, and salt until the mix turns pale yellow and thickens slightly. This takes about 2 minutes of steady whisking. As a result, the sugar melts into the yolks and forms a smooth base for the custard.
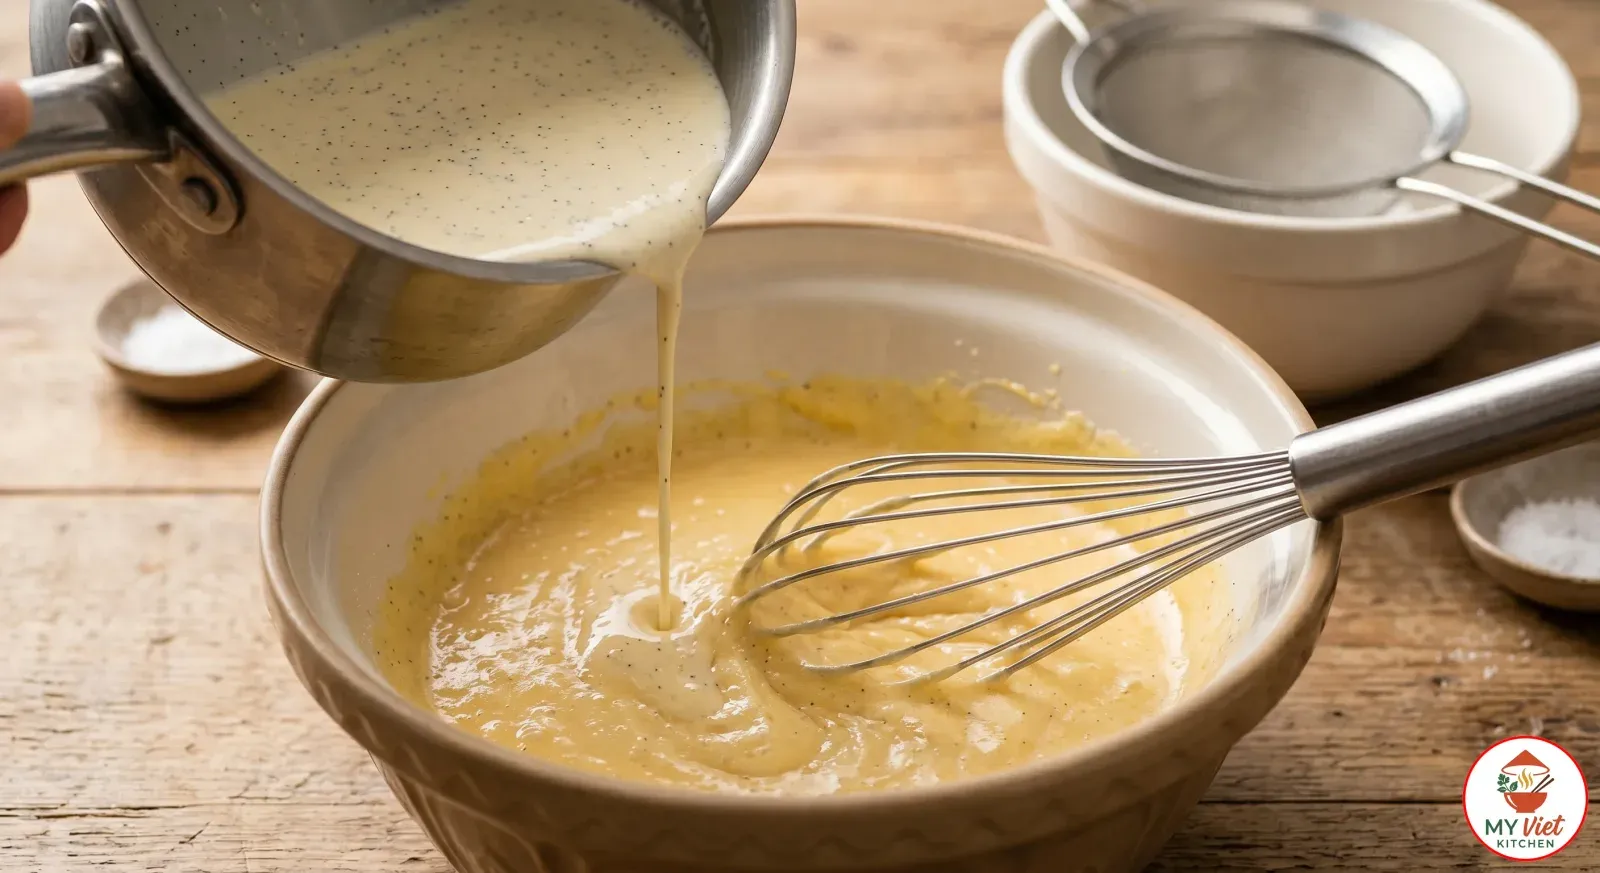
Now comes the key technique called tempering. Slowly pour the warm cream into the egg mix in a thin, steady stream while whisking the whole time. If you pour too fast, the hot liquid will scramble the eggs. Instead, tempering raises the yolk heat bit by bit so they blend smoothly with the cream. After combining, pour the mix through a fine mesh sieve into a clean bowl. Consequently, the sieve catches any bits of cooked egg or vanilla pod fibers, giving you a perfectly smooth custard.
Step 3: Bake in a Water Bath
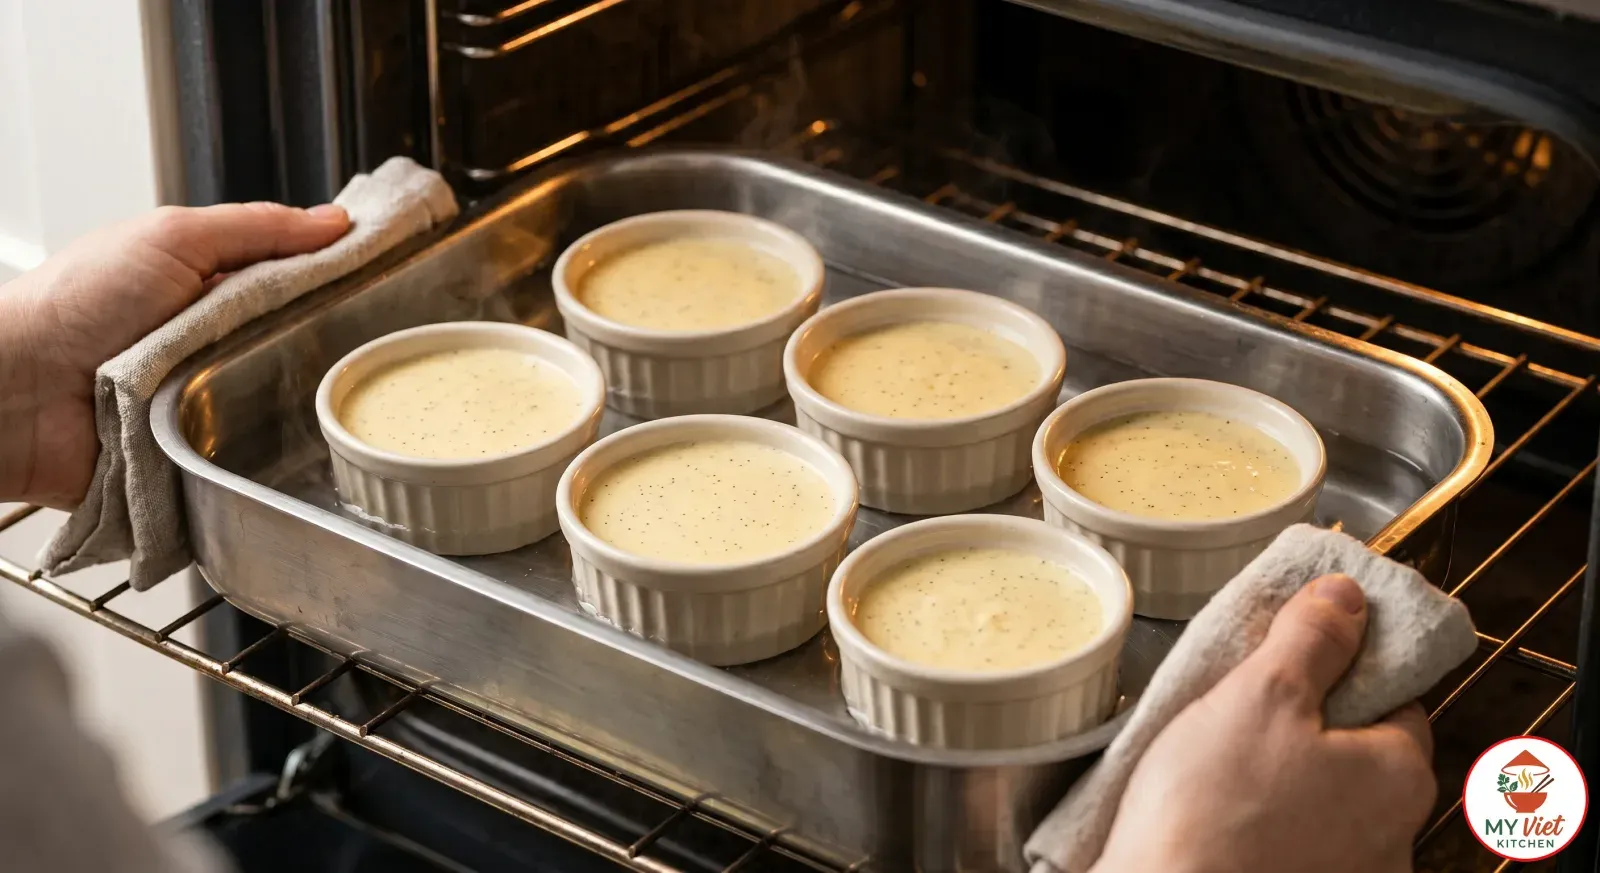
3 First, divide the strained custard evenly among six ramekins. If any air bubbles sit on the top, pop them with a toothpick or gently blow on them. Next, place the filled ramekins in a deep baking dish or roasting pan. Then carefully pour hot water into the baking dish until it reaches halfway up the sides of the ramekins.
The water bath, also known as a bain-marie, is key for gentle, even cooking. It shields the custard from the harsh heat of the oven. Without it, the edges overcook while the center stays raw. Bake at 325 degrees for 40 to 45 minutes. The custard is done when the edges look set but the center still jiggles like gelatin when you shake the pan gently. In other words, it should wobble but not slosh. Since overbaking makes the texture grainy, pull the ramekins out while they still look slightly underdone.
Step 4: Chill and Caramelize the Sugar
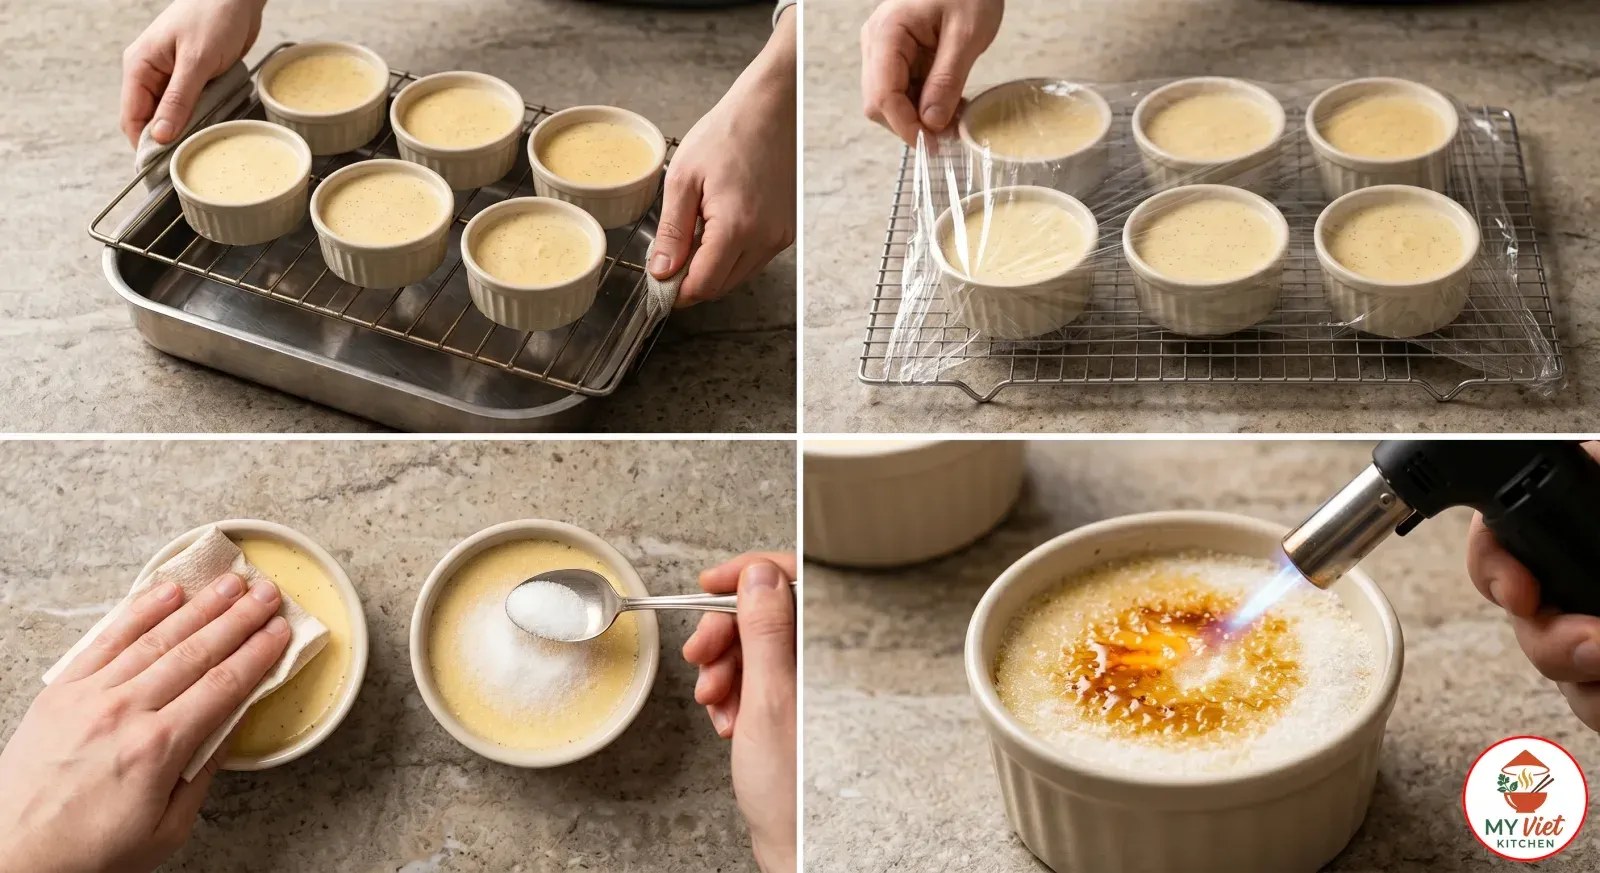
4 Carefully lift the ramekins out of the water bath using tongs or a spatula. Let them cool on a wire rack at room temperature for about 30 minutes. Then cover each ramekin with plastic wrap and refrigerate for at least 4 hours. Overnight chilling gives the best results because the custard firms up completely and the flavors deepen.
When you are ready to serve, take the ramekins from the fridge. Blot any moisture from the top with a paper towel. Then sprinkle about 1 tablespoon of sugar evenly across the surface. Hold your torch about 3 inches away and move the flame in slow circles. The sugar will melt, bubble, and turn amber. Stop just before it looks dark brown because the leftover heat keeps working for a few more seconds. Therefore, pulling away slightly early prevents a bitter, burnt taste. Finally, let the sugar crust harden for 1 to 2 minutes before serving.
Expert Tips for Perfect Creme Brulee
Use Egg Yolks Only
Whole eggs contain whites that set firmly at high heat. Egg yolks, on the other hand, create a denser and creamier custard. In particular, the extra fat in yolks gives the dessert its rich feel. Five yolks per two cups of cream is the classic ratio. If you reduce the yolks, the custard turns too thin. Likewise, adding more can make it overly eggy. So stick to this ratio for the best balance.
Strain the Custard Twice
Straining through a fine mesh sieve removes any tiny lumps of cooked egg that formed during tempering. For the smoothest texture, strain the mix twice. The second pass catches bits that slipped through the first time. Additionally, straining removes vanilla pod fibers and chalazae from the egg yolks. Indeed, this small extra step makes a clear difference in the final product.
Keep the Water Bath Steady
Always pour the hot water into the baking dish after placing it on the oven rack. Otherwise, carrying a heavy pan of water across the kitchen risks spilling and burns. The water should reach halfway up the ramekins. If the water level drops during baking, add more with a kettle. Furthermore, placing a dish towel on the bottom of the pan prevents the ramekins from sliding and also helps spread heat evenly.
Creme Brulee vs. Other French Custard Desserts
French cuisine features several custard-based desserts, each with its own distinct character. Understanding the differences helps you choose the right recipe for any occasion. Here is how creme brulee compares to its closest relatives.
| Dessert | Base | Setting Method | Signature Feature |
|---|---|---|---|
| Creme Brulee | Cream and egg yolks | Baked in water bath | Torched sugar crust |
| Creme Caramel (Flan) | Milk, eggs, and sugar | Baked in water bath | Liquid caramel sauce on top |
| Pot de Creme | Cream, egg yolks, chocolate | Baked or stovetop | Dense, mousse-like texture |
| Panna Cotta | Cream and sugar (Italian) | Set with gelatin | No eggs, jiggly and light |
| Clafoutis | Egg batter with fruit | Baked without water bath | Cherries baked into custard |
Serving Suggestions
Creme brulee is traditionally served in the ramekin it bakes in, which makes presentation effortless. The dessert arrives at the table looking polished and elegant without any plating fuss. Below are some ways to elevate the experience even further.
The Perfect Accompaniments:
- Fresh berries: A small cluster of raspberries, blueberries, or strawberry slices on the side adds color and a tart contrast to the rich custard. The acidity of the fruit cuts through the cream beautifully.
- Shortbread cookies: A thin, buttery shortbread or tuile cookie provides a crunchy textural companion. It also gives guests something to scoop with after the sugar crust breaks.
- Mint sprig: A single fresh mint leaf on the ramekin rim adds a touch of green that brightens the visual appeal. The herbal aroma also complements the warm vanilla.
Beverage Pairings:
- Sauternes or late-harvest Riesling: These sweet, golden wines mirror the richness of the custard while their acidity keeps the palate refreshed. They are the classic French pairing for creme brulee.
- Espresso: A shot of strong espresso after the dessert provides a bitter, roasted contrast that balances the sweetness. This is a popular choice at French restaurants.
- Champagne or sparkling wine: The effervescence lifts the heaviness of the cream and cleanses the palate between bites. Brut Champagne works best because its dryness offsets the sugar.
- Herbal tea: A cup of chamomile or lavender tea creates a calming end to a meal. The floral notes echo the vanilla in the custard without competing for attention.
Storage and Reheating
Refrigerator: Store the baked custards covered with plastic wrap for up to 3 days. The custard actually improves in texture after a full day of chilling because it sets more firmly. However, do not add the sugar topping until just before serving. The caramelized crust softens and dissolves within 30 minutes if refrigerated.
Freezer: You can freeze unbaked custard in ramekins for up to 1 month. Cover each ramekin tightly with plastic wrap and foil. Thaw overnight in the fridge before baking. Alternatively, freeze the baked custards without the sugar topping. Thaw in the refrigerator for at least 8 hours before torching the sugar.
Reheating: Creme brulee is best served cold or at cool room temperature. It does not require reheating. In fact, warming a set custard can break the smooth texture and cause it to weep liquid. Simply remove it from the fridge 10 minutes before torching. This slight warming takes the chill off without compromising the custard structure.
Common Mistakes to Avoid
1. Skipping the Water Bath
Baking without a water bath exposes the custard to harsh, dry heat. As a result, you get a cracked top and a grainy, overcooked texture around the edges. The water bath keeps the oven moist and holds a gentle heat around each ramekin. So always use one. There is no shortcut that gives the same silky result.
2. Overbaking the Custard
Many cooks leave the custard in the oven until it looks fully set. By that point, it has already overbaked. The center should still wobble like gelatin when you gently shake the pan. Residual heat firms it up as it cools. Pulling the ramekins out while the center jiggles ensures a creamy final texture. Consequently, trusting the jiggle test prevents the most common creme brulee failure.
3. Adding Sugar Too Thick
A thick sugar layer takes too long to caramelize and can heat the custard underneath. You want a thin, even coating of about one tablespoon per ramekin. Tilt the ramekin to spread the sugar evenly across the surface. Tap out any excess. A thinner layer melts faster, caramelizes more evenly, and cracks cleanly when you tap it with a spoon.
4. Torching Too Close or Too Slow
Holding the torch too close scorches one spot while the rest stays raw. Keep the flame about 3 inches from the sugar surface. Move it in steady, continuous circles across the entire ramekin. Work at a brisk pace. The sugar should melt, bubble, and turn amber within 30 to 60 seconds. Also, let the crust harden completely before serving, which takes about 1 to 2 minutes.
Frequently Asked Questions
What is the difference between creme brulee and panna cotta?
Creme brulee is a baked egg custard topped with caramelized sugar, while panna cotta is an Italian dessert set with gelatin instead of eggs. The texture differs significantly. Creme brulee has a dense, silky richness from egg yolks, whereas panna cotta is lighter and more jiggly. Furthermore, creme brulee features a signature crackly sugar crust that panna cotta does not have.
Can I make creme brulee without a kitchen torch?
Yes, your oven broiler works as an alternative. Place the chilled, sugar-topped ramekins on a baking sheet and position them under a hot broiler for 2 to 4 minutes. Watch closely because the sugar can go from amber to burnt in seconds. A torch gives you much more control. However, the broiler method produces a perfectly acceptable result in a pinch.
Why did my creme brulee curdle?
Curdling happens when the custard bakes at too high a temperature or for too long. The egg proteins seize and squeeze out moisture, creating a lumpy texture. The water bath prevents this by keeping the heat gentle and even. Always bake at 325 degrees Fahrenheit and remove the custards when the centers still jiggle. Additionally, tempering the eggs properly before baking avoids scrambling them in the first place.
How far in advance can I make creme brulee?
You can bake the custards up to 3 days ahead. Cover them with plastic wrap and store in the fridge. The texture actually improves after a full day because the custard sets more firmly. However, always torch the sugar topping right before serving. The caramelized crust starts softening within 30 minutes of sitting. Therefore, timing the torch is the only last-minute step.
Can I use vanilla extract instead of a vanilla bean?
Absolutely. Two teaspoons of pure vanilla extract replaces one vanilla bean effectively. Add it to the cream after heating rather than before, since high heat diminishes some volatile flavor compounds. A vanilla bean offers a more complex, aromatic result with beautiful visible specks. Nonetheless, extract produces a delicious creme brulee that most people enjoy just as much.
What type of sugar works best for the caramelized topping?
Fine granulated white sugar gives the most even, glass-like crust. Superfine or caster sugar melts even faster and produces an especially thin layer. Avoid brown sugar because it contains molasses and moisture that interfere with clean caramelization. Similarly, powdered sugar has cornstarch that prevents proper melting. Stick with plain white granulated or superfine sugar for the best results.
Variations and Adaptations
Lavender Creme Brulee:
Add 1 tablespoon of dried culinary lavender to the cream during the steeping stage. The floral notes pair beautifully with the vanilla and create a Provencal twist on the classic. Strain the lavender out along with the vanilla pod before mixing with the eggs. Be careful not to use too much lavender, as it can taste soapy in excess. This variation is popular at French countryside restaurants.
Chocolate Creme Brulee:
Stir 4 ounces of finely chopped dark chocolate into the warm cream until melted and smooth. The chocolate adds a bittersweet depth that transforms the custard into something closer to a pot de creme. Reduce the sugar in the base by 2 tablespoons to balance the added sweetness. Furthermore, the darker custard creates a striking visual contrast with the golden sugar crust on top.
Espresso Creme Brulee:
Dissolve 2 tablespoons of instant espresso powder into the warm cream, or replace 1/4 cup of the cream with freshly brewed espresso. The coffee flavor complements the vanilla beautifully and adds a roasted complexity. This version is an excellent choice after a dinner party because it combines dessert and coffee in one dish. Additionally, espresso creme brulee pairs wonderfully with a glass of Amaretto.
Dairy-Free Creme Brulee:
Replace the heavy cream with full-fat coconut cream for a dairy-free version that still sets beautifully. Coconut cream has enough fat to mimic the richness of heavy cream. The coconut flavor adds a tropical twist that some people prefer to the original. Keep the egg yolks as they are, since they provide the structure. However, note that this version will have a subtle coconut taste throughout.
The Cultural Significance of Creme Brulee
The origins of creme brulee are the subject of a long-standing culinary debate. France, England, and Spain all claim to have invented it. The earliest known recipe appeared in a 1691 French cookbook by Francois Massialot. However, England’s Trinity College at Cambridge has served a similar dessert called “burnt cream” since the 1870s. Spain also stakes a claim through crema catalana, which uses a hot iron instead of a torch to caramelize the sugar. Regardless of its true birthplace, France made the dessert famous worldwide.
In French dining culture, creme brulee occupies a special place on the dessert menu. It represents the philosophy that great cooking does not require complicated preparations. Five humble ingredients transform into something extraordinary through careful technique. This idea is central to French culinary tradition, where mastery of fundamentals matters more than flashy ingredients. Consequently, creme brulee has become a benchmark dessert for judging a restaurant’s pastry skills.
The dessert experienced a global surge in popularity during the 1980s when nouvelle cuisine made it a menu staple. Since then, chefs around the world have created countless variations, from matcha creme brulee in Japan to dulce de leche versions in Argentina. Despite all these adaptations, the classic French vanilla version remains the most beloved. Its enduring appeal proves that simplicity, when executed with precision, never goes out of style.
Conclusion
This creme brulee recipe demonstrates that restaurant-quality desserts are absolutely achievable at home. Master the water bath for gentle baking, temper your eggs with care, and torch the sugar with confidence. Those three skills are all you need to produce a flawless result every time. The creamy vanilla custard and crackly caramel topping will impress everyone at your table. In fact, once you discover how straightforward this classic French dessert truly is, it will become a regular in your cooking rotation.
Looking for more beloved European desserts and dishes? Explore our European dishes collection for classics like French crepes, tiramisu, and Sachertorte. Each recipe features the same detailed, step-by-step approach to bring world cuisine to your kitchen.