
Classic French Croissants are the crown jewel of French baking — impossibly flaky, deeply buttery, and golden on the outside with a soft, honeycomb interior of delicate layers. This recipe walks you through the traditional viennoiserie lamination technique step by step, turning simple pantry ingredients into bakery-quality croissants that shatter at first bite and fill your kitchen with the most intoxicating aroma imaginable.
Prep Time: 60 minutes (active) | Cook Time: 18 minutes | Total Time: ~13 hours (including resting) | Yield: 12 croissants
Difficulty: Hard | Calories: ~272 per croissant

What Makes French Croissants Special?
A croissant is a triumph of patience over simplicity. The ingredient list is astonishingly short — flour, butter, milk, sugar, yeast, salt — yet the technique of lamination transforms them into something extraordinary. By folding a slab of cold butter into the dough three times, you create 27 alternating layers of butter and dough. In the oven’s heat, the water in the butter turns to steam, puffing each layer apart, while the fat fries the dough into impossibly crisp, golden sheets.
Despite its French identity, the croissant traces its ancestry to the Austrian kipferl, a crescent-shaped bread brought to Paris in the early 19th century. French bakers reinvented it by applying laminated dough techniques borrowed from puff pastry, and the modern croissant was born. By the early 20th century, it had become the undisputed symbol of the French breakfast table, and today no Parisian boulangerie opens its doors without a tray of freshly baked croissants in the window.
What separates a truly great croissant from a mediocre one comes down to three things: the quality of the butter, the precision of the lamination, and the patience of the proof. This recipe covers all three in detail so you can achieve results that rival any French bakery — right in your own kitchen.
Choosing the Right Butter
Butter is the star of this recipe — it makes up nearly a third of the finished croissant by weight. The type of butter you choose has an enormous impact on flavor, flakiness, and workability during lamination.
- European-style butter (best choice): Brands like Plugrá, Kerrygold, or President contain 82 to 86 percent butterfat. The higher fat content produces more distinct layers, a richer flavor, and a dough that is easier to laminate because there is less water to create steam pockets that tear the layers. This is the closest to what French bakers use.
- Professional beurre sec (dry butter): Available at specialty baking suppliers, this contains 84 percent fat or higher with very low moisture. It is the most pliable and forgiving butter for lamination. If you can find it, it is the gold standard, but European-style butter is an excellent substitute.
- Regular unsalted butter (substitute): Standard American butter at 80 percent fat will work, but the slightly higher moisture content makes the layers less crisp and the butter more prone to melting during folding. Keep everything as cold as possible if using this option.
Ingredients for Classic French Croissants
For the Dough (Détrempe):
- 500g (4 cups) all-purpose flour
- 10g (2 teaspoons) fine salt
- 80g (1/3 cup + 1 tablespoon) granulated sugar
- 10g (1 tablespoon) instant yeast
- 300ml (1 1/4 cups) whole milk, cold
- 30g (2 tablespoons) unsalted butter, softened
For the Butter Block (Beurrage):
- 280g (1 1/4 cups) unsalted European-style butter, cold
For the Egg Wash:
- 1 large egg
- 1 tablespoon whole milk
- Pinch of salt
Pro tip: Weigh your ingredients with a kitchen scale rather than using cup measurements. Baking is a science, and the precision of grams versus cups can make the difference between perfect layers and a dense, heavy croissant. A $15 kitchen scale is the single best investment for any home baker.
Step-by-Step Instructions
Step 1: Make the Dough (Détrempe)
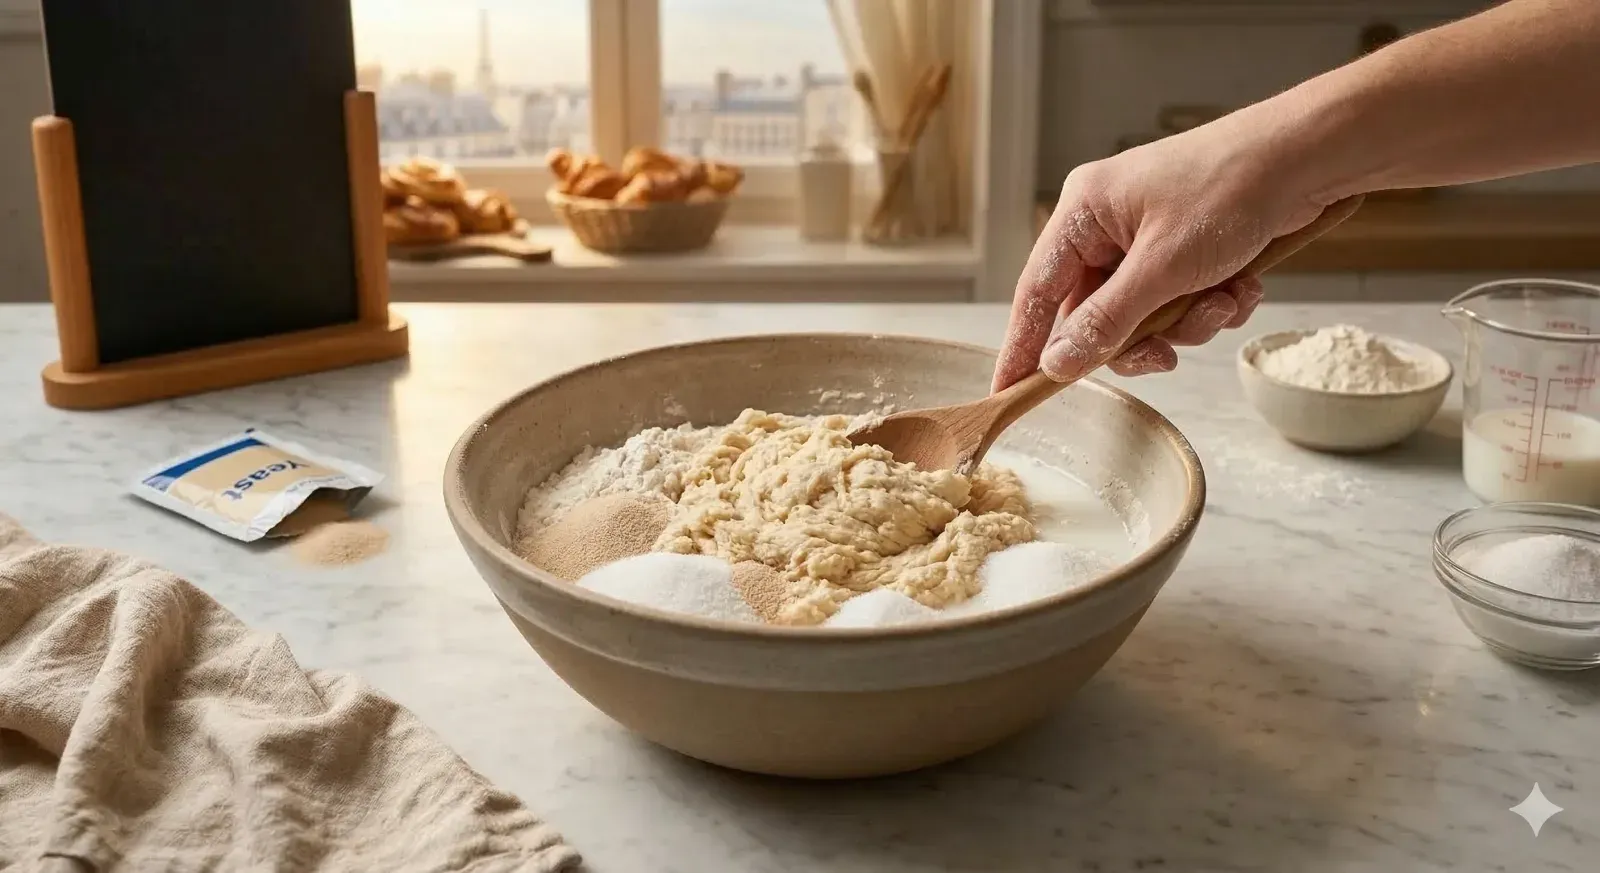
1In a large mixing bowl, whisk together the flour, salt, sugar, and instant yeast until evenly combined. Pour in the cold milk and add the softened butter. Mix with a wooden spoon or dough scraper until a shaggy, rough dough forms, then turn it out onto a lightly floured surface. Knead gently for 4 to 5 minutes — just until the dough is smooth and holds together. Resist the temptation to knead longer: overdeveloping the gluten at this stage will make the dough elastic and difficult to roll later. Shape the dough into a flat rectangle about 2cm (3/4 inch) thick, wrap tightly in plastic wrap, and refrigerate for at least 1 hour or up to overnight.
Step 2: Prepare the Butter Block (Beurrage)
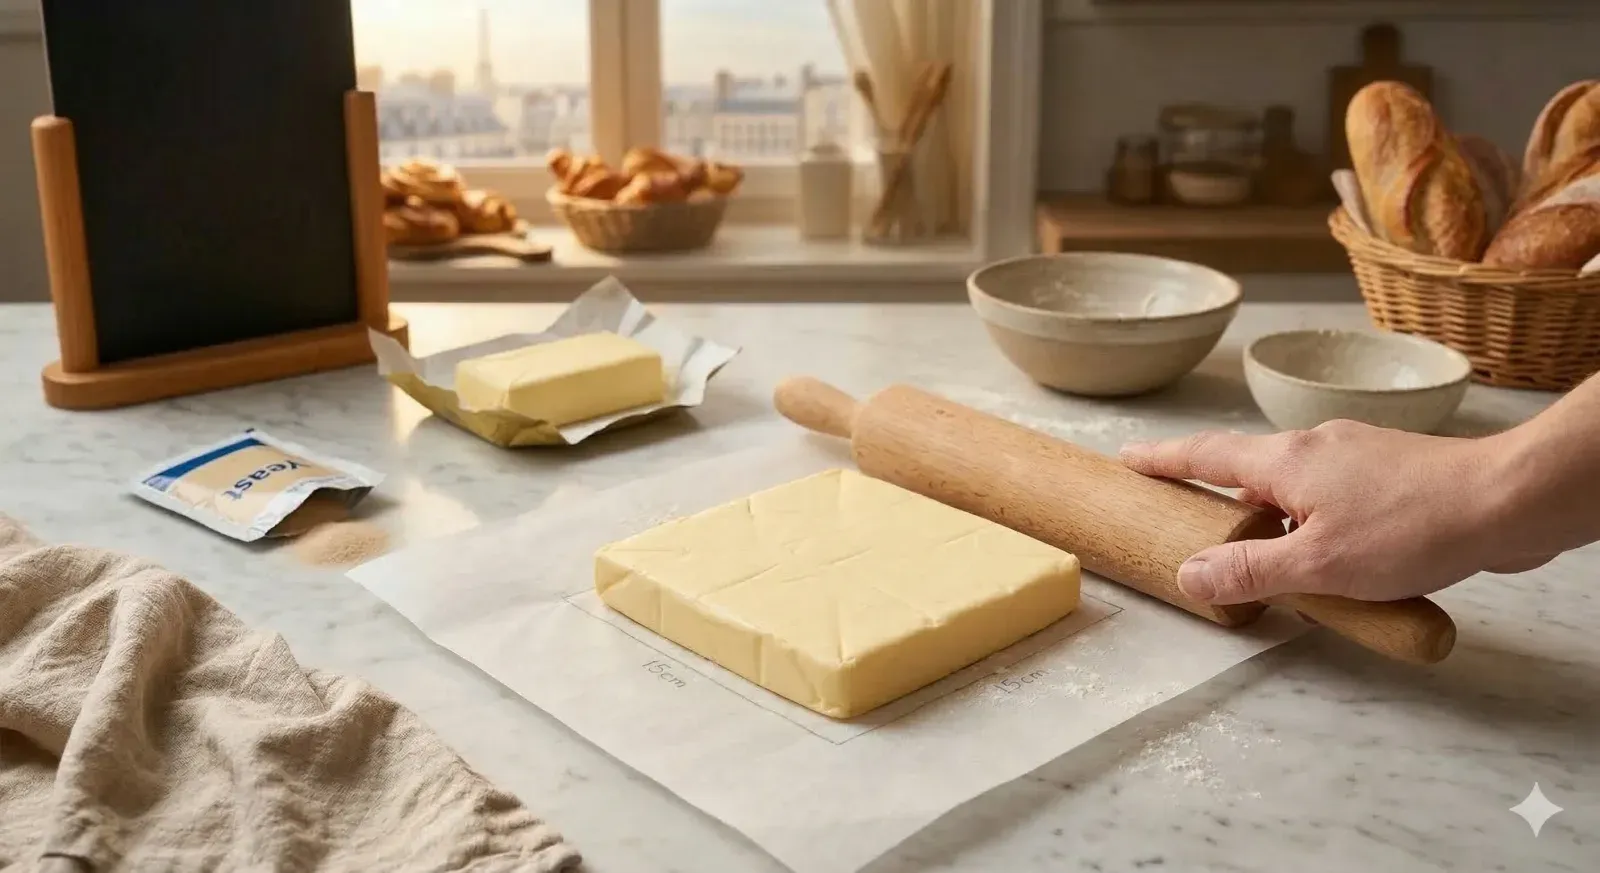
2Place the cold butter between two large sheets of parchment paper. Using a rolling pin, pound and roll the butter into a smooth, even square approximately 15cm by 15cm (6 by 6 inches) and about 1cm (3/8 inch) thick. The butter should be pliable enough to bend without cracking, but still cold to the touch — roughly the same firmness as the chilled dough. If the butter is too hard, let it sit at room temperature for 2 to 3 minutes and pound it again. If it gets too soft and greasy, slide it back into the refrigerator for 5 minutes. Consistency between the butter and dough is the single most critical factor in achieving clean lamination.
Step 3: Enclose the Butter (Lock-In)
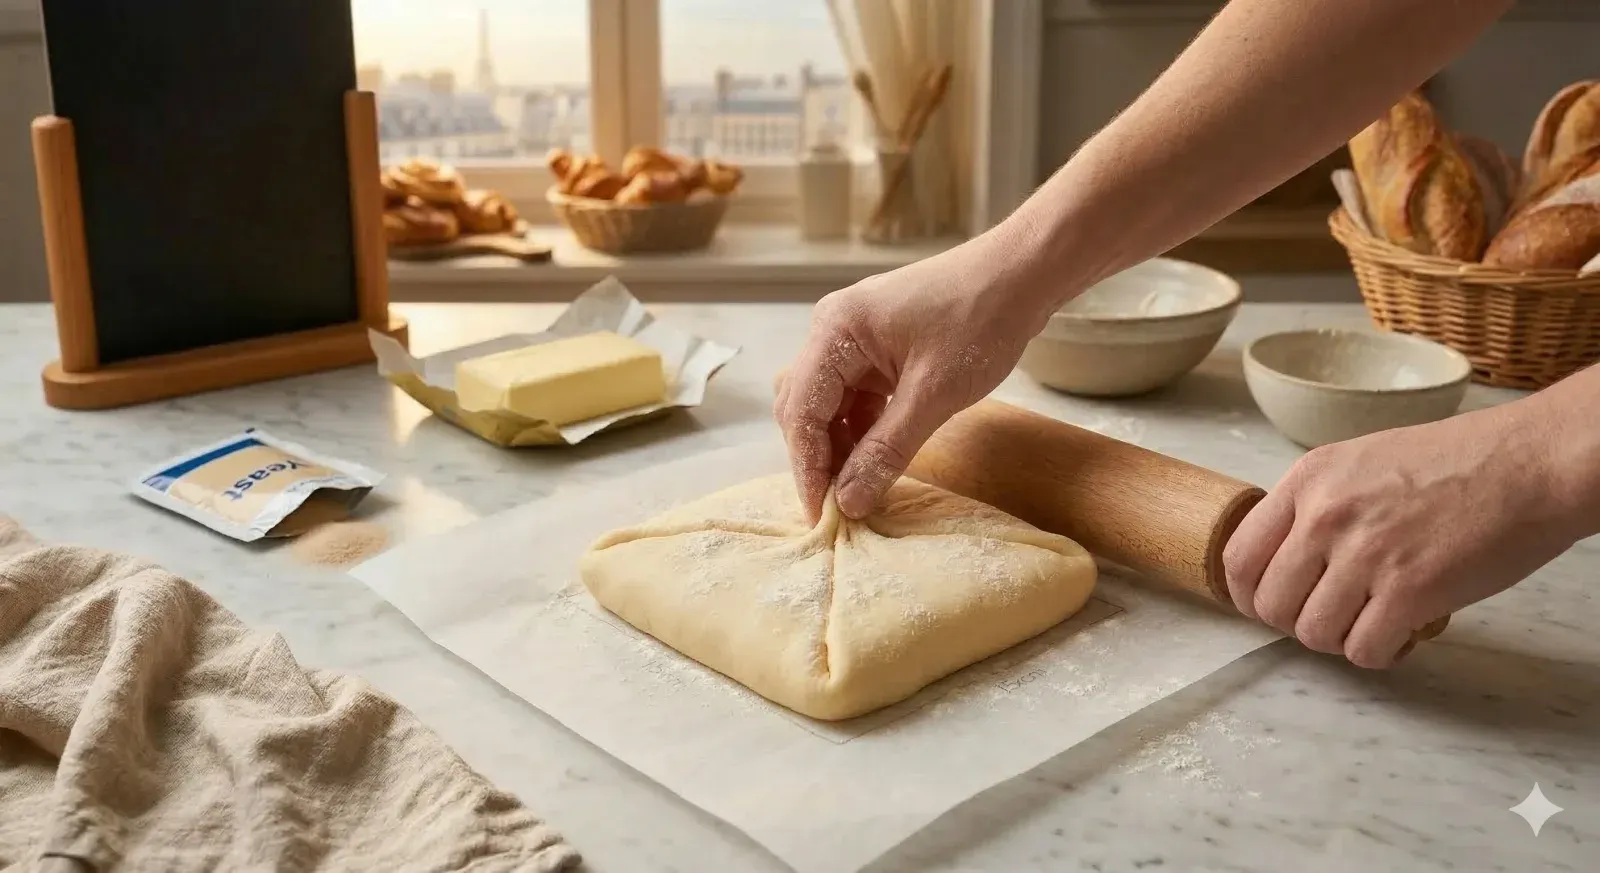
3Remove the dough from the refrigerator. On a lightly floured surface, roll it out into a rectangle roughly twice the width and slightly longer than the butter block — about 30cm by 18cm (12 by 7 inches). Place the butter block in the center of the dough at a 45-degree angle, so it looks like a diamond on a rectangle. Fold each of the four dough flaps over the butter like an envelope, stretching slightly if needed, and pinch all the seams tightly to seal. No butter should be visible. Lightly dust the top with flour and gently press with the rolling pin to even out the thickness before the first roll.
Step 4: First Fold (Single Turn)
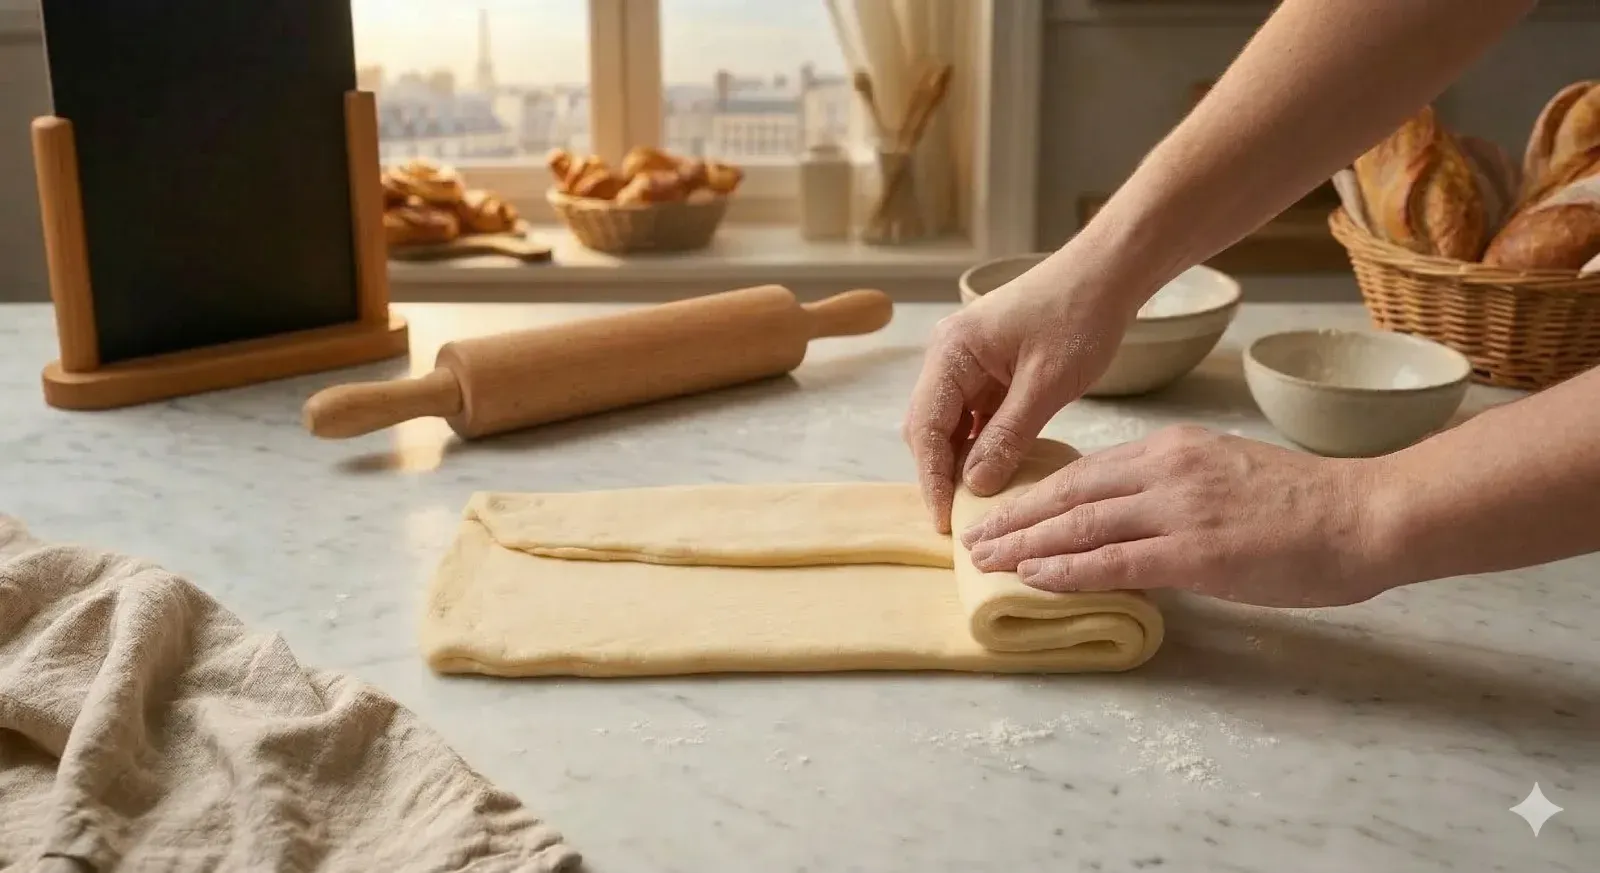
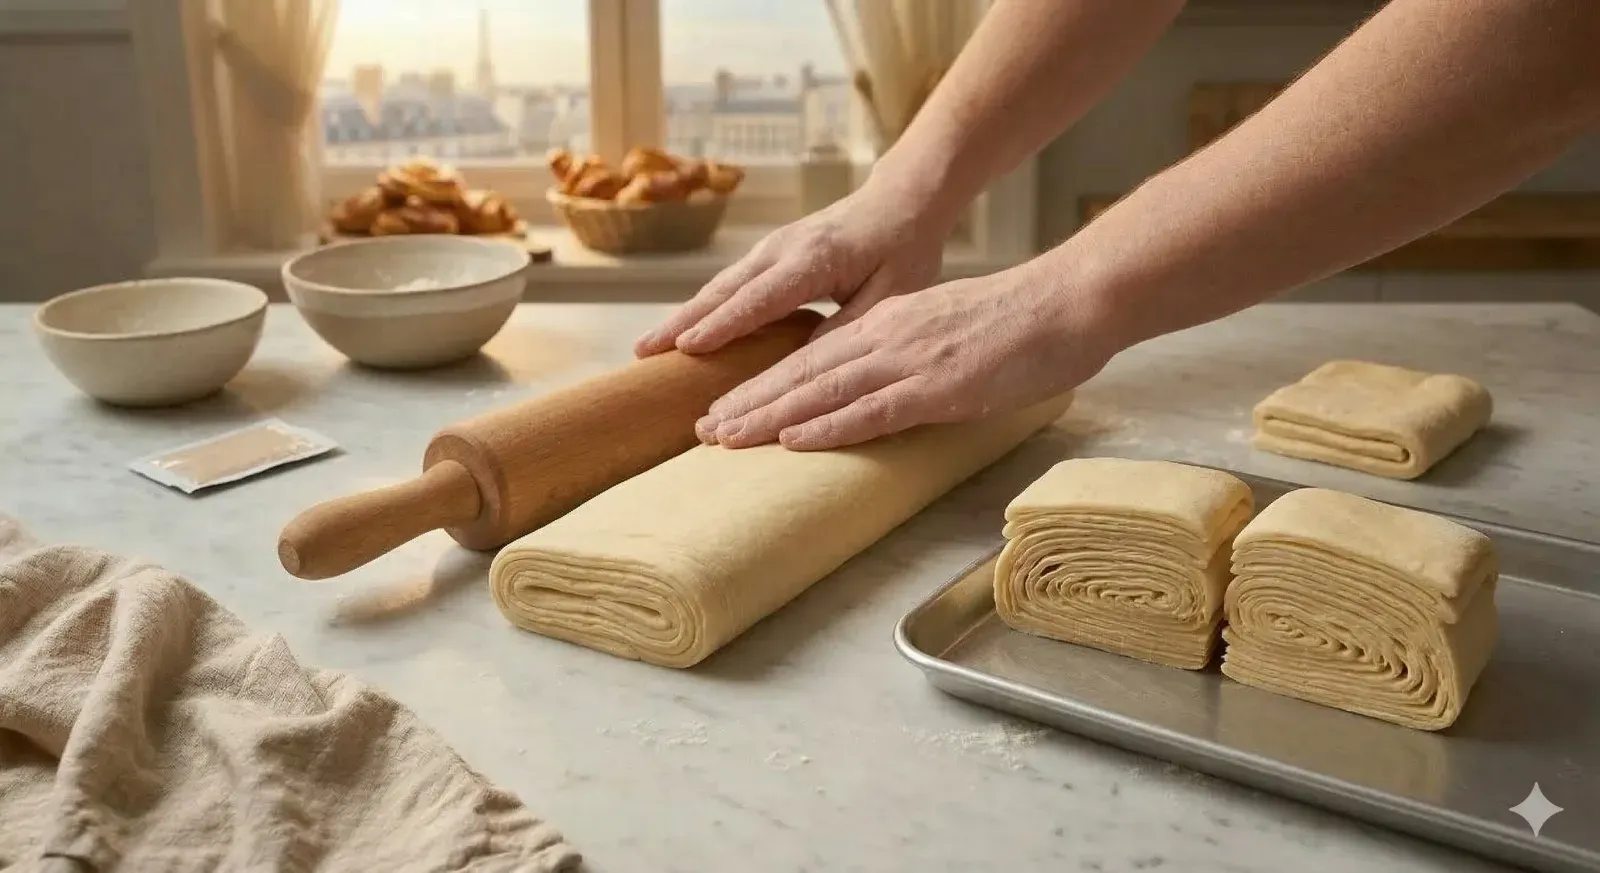
4With the sealed side facing up, roll the dough out into a long rectangle approximately 50cm by 20cm (20 by 8 inches). Work slowly and apply even pressure — do not force the rolling pin, as tearing the dough at this stage means the butter will leak through and ruin the layers. Fold the dough in thirds like a business letter: bring the bottom third up to the center, then fold the top third down over it. This is your first single fold, creating 3 layers of butter. Wrap the dough tightly in plastic wrap and refrigerate for 30 minutes. This rest relaxes the gluten and re-firms the butter.
Step 5: Second and Third Folds
5After 30 minutes of chilling, remove the dough and rotate it 90 degrees from the last fold direction. Roll it out again to the same 50cm by 20cm (20 by 8 inches) rectangle and fold it in thirds again. This is your second fold — you now have 9 layers. Wrap, refrigerate for another 30 minutes, then repeat one final time for the third fold. After three single folds, you have 27 layers of alternating butter and dough. Wrap the dough tightly and refrigerate for at least 1 hour, preferably overnight. An overnight rest develops flavor through slow fermentation and ensures the butter is thoroughly chilled for clean cutting and shaping.
Step 6: Shape the Croissants
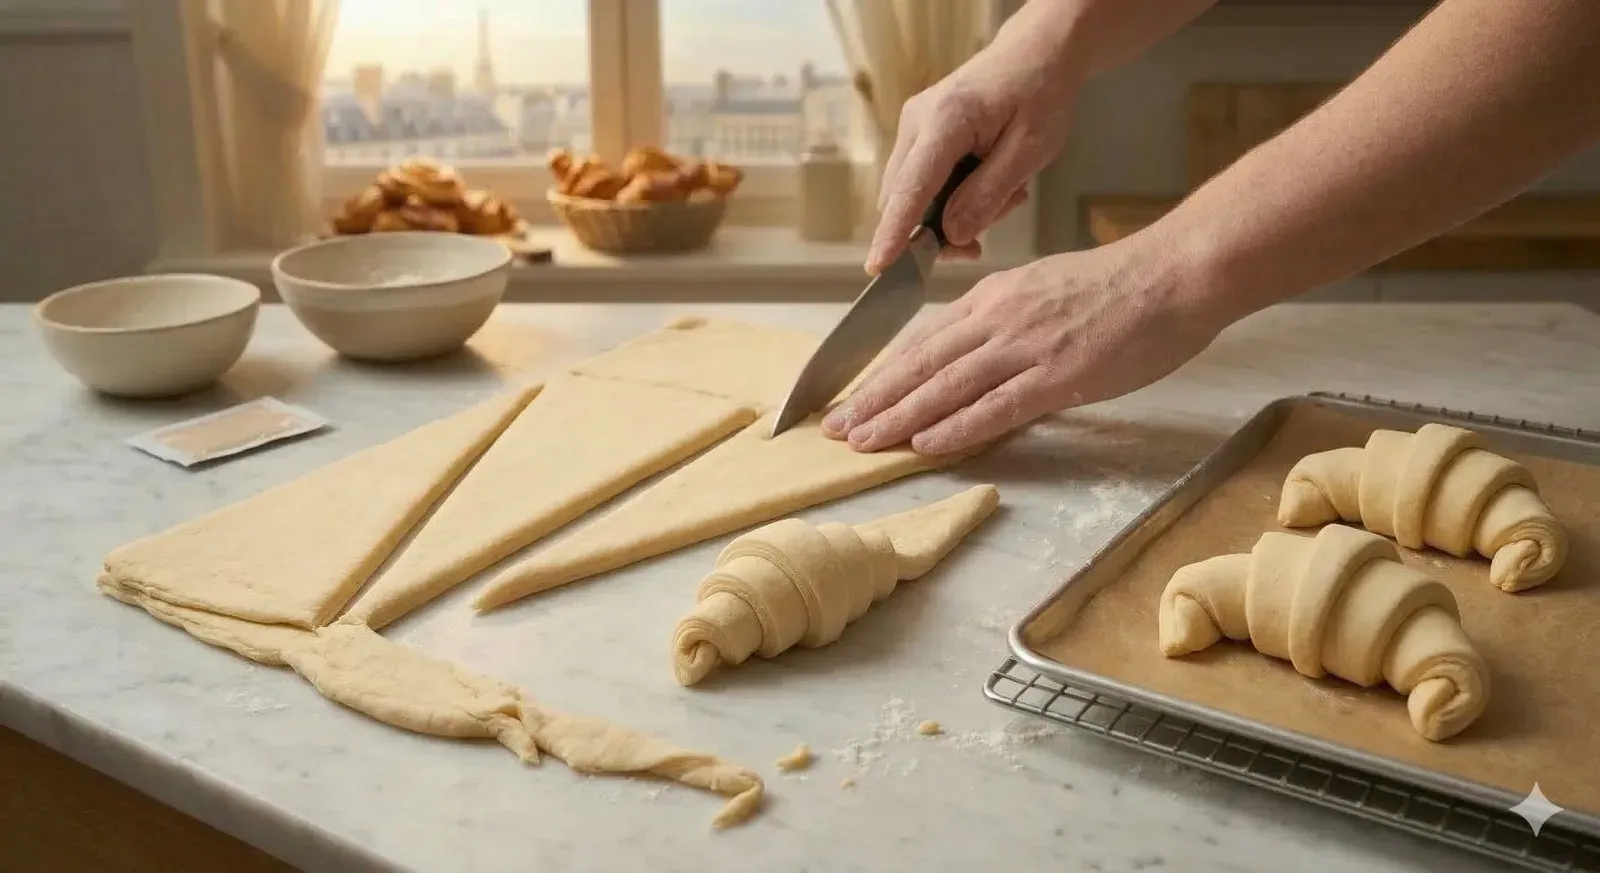
6On a lightly floured surface, roll the dough into a large rectangle approximately 55cm by 25cm (22 by 10 inches) and about 5mm (1/4 inch) thick. Using a sharp knife or pizza cutter, trim the uneven edges (these scraps can be baked as is for a treat). Cut the dough into tall, narrow triangles approximately 10cm (4 inches) wide at the base and 20cm (8 inches) long. Make a small 1cm (1/2 inch) notch at the center of each triangle’s base. Gently stretch the triangle by pulling the tip, then roll from the base toward the tip, tucking the tip underneath. Curve the two ends inward to form the classic crescent shape. Place on a parchment-lined baking sheet with at least 5cm (2 inches) of space between each one.
Step 7: Proof the Croissants
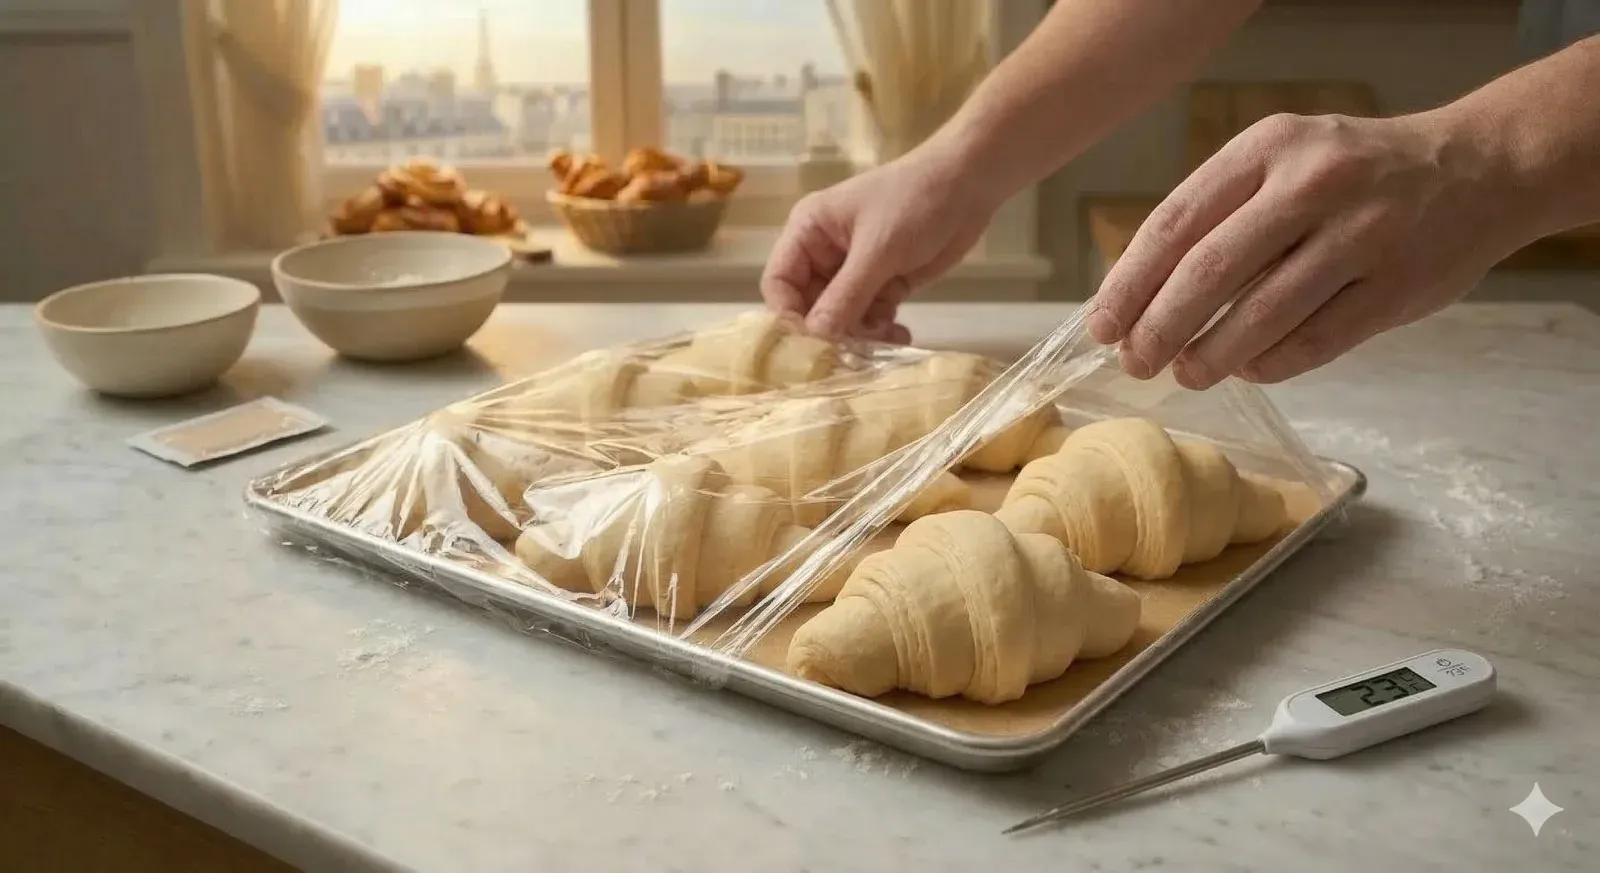
7Cover the shaped croissants loosely with plastic wrap (make sure it does not touch the surface of the dough). Let them proof at cool room temperature — ideally between 21 and 24°C (70 to 75°F) — for 2 to 2.5 hours. This is a slow proof, and patience is essential. The croissants should nearly double in size, feel very light and jiggly when you gently shake the tray, and you should be able to see the distinct layers of lamination on the sides. Do not rush this step by placing them in a warm spot — if the butter melts during proofing, the layers will fuse together and the croissants will bake up flat and dense.
Step 8: Egg Wash and Bake
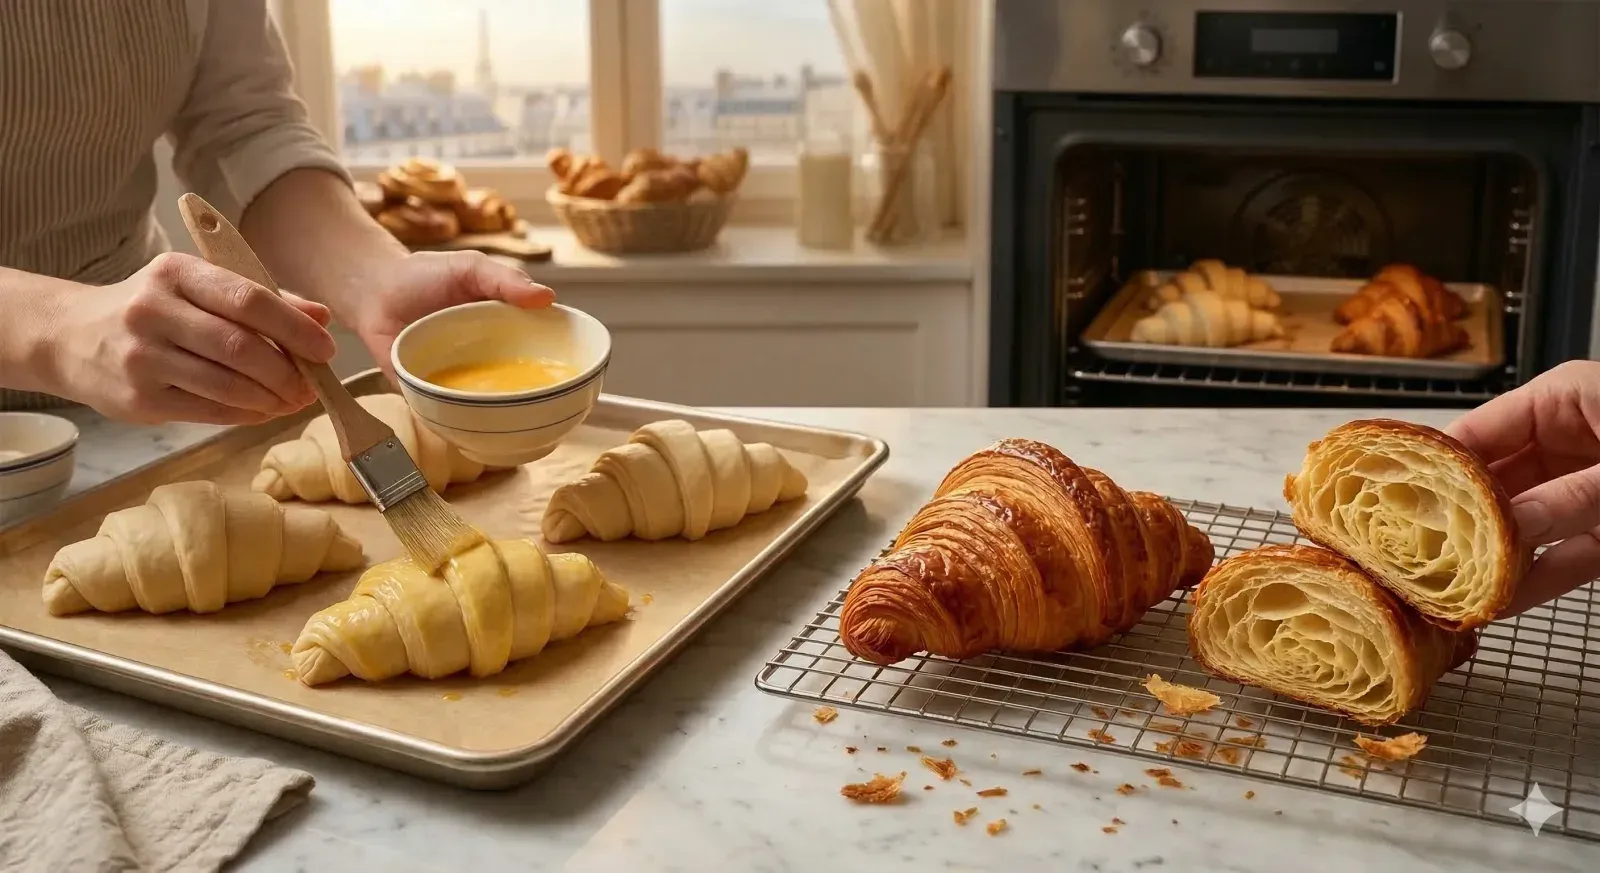
8Preheat your oven to 200°C (400°F) with the rack in the center position. Whisk together the egg, milk, and a pinch of salt to make a smooth egg wash. Using a soft pastry brush, gently coat each croissant with a thin, even layer of egg wash. Take care not to let the egg wash drip down the sides and pool on the cut layers — this would seal them shut and prevent them from puffing apart in the oven. Bake for 16 to 18 minutes, rotating the tray halfway through, until the croissants are a deep, even golden brown. They should feel surprisingly light when lifted. Transfer to a wire rack and let cool for at least 10 minutes — the interior is still steaming and setting during this time. Then tear one open, admire the honeycomb of layers inside, and enjoy.
Expert Tips for Perfect Croissants
Temperature Is Everything
The butter and dough must be the same consistency — cold and firm but pliable. If the butter is too hard, it will crack and break into chunks inside the dough instead of forming continuous sheets. If it is too soft, it will melt into the dough and you will lose your layers entirely. The ideal working temperature for both is around 15°C (59°F). If at any point during rolling the dough starts to feel soft or you see greasy spots, stop immediately and refrigerate for 15 to 20 minutes.
Roll Gently and Evenly
Apply steady, even pressure with the rolling pin, working from the center outward. Never force the dough or press down hard, as this can tear the delicate butter layers. If the dough springs back stubbornly during rolling, the gluten is too tight — cover it and rest for 10 minutes, then try again. The dough will relax and become much more cooperative.
Use a Sharp Blade for Cutting
A dull knife will compress and seal the layers at the cut edge, preventing the croissant from rising properly. Use a very sharp chef’s knife, a pizza wheel, or even a bench scraper to cut clean triangles. Cut with decisive downward strokes rather than sawing back and forth.
Croissant Styles Around the World
The French croissant has inspired countless variations across the globe. Understanding how different cultures have adapted this pastry can inspire your own creative twists.
| Style | Origin | Defining Characteristic |
|---|---|---|
| Croissant au Beurre (straight shape) | France | Made with pure butter. Straight shape indicates all-butter. The standard of excellence. |
| Croissant Ordinaire (crescent shape) | France | Traditionally made with margarine. Curved crescent shape signals margarine in French bakeries. |
| Pain au Chocolat | France | Same laminated dough rolled around two sticks of dark chocolate. Rectangular shape. |
| Cornetto | Italy | Slightly sweeter dough, often filled with custard, jam, or Nutella. Softer interior. |
| Medialuna | Argentina | Smaller, sweeter, glazed with sugar syrup. Served with café con leche. |
| Sừng Bò (Croissant) | Vietnam | French-influenced but adapted with local butter and sometimes pandan or coconut filling. |
Serving Suggestions
In France, croissants are traditionally eaten at breakfast or as a mid-morning snack. A freshly baked croissant needs no embellishment — tear it apart with your hands (never cut with a knife), let the buttery flakes scatter, and enjoy the warm, rich layers as they are. However, there are many delicious ways to elevate the experience.
The Perfect Accompaniments:
- High-quality salted butter and jam: A classic French combination — spread a thin layer of salted butter and a spoonful of apricot or raspberry preserves on a torn croissant half. The salt amplifies the buttery layers beautifully.
- Honey or Nutella: A drizzle of wildflower honey or a generous spread of Nutella turns a plain croissant into an indulgent treat that both children and adults adore.
- Ham and Gruyère (croissant sandwich): Slice the croissant horizontally, layer thinly sliced ham and Gruyère cheese inside, and warm in the oven for 3 minutes. This is a staple of French cafés and makes a satisfying light lunch.
- Almond cream filling: Spread frangipane (almond cream) on a day-old croissant, top with sliced almonds and powdered sugar, and bake for 8 minutes. This transforms leftover croissants into the legendary croissant aux amandes.
Beverage Pairings:
- Café au lait: The quintessential French pairing — a large bowl of half coffee, half steamed milk. The mild coffee complements the butter without overpowering the delicate pastry.
- Espresso: A strong shot of espresso provides a bold, slightly bitter contrast that cuts through the richness of the butter layers.
- Hot chocolate: Thick, European-style hot chocolate alongside a croissant is pure indulgence, especially on a cold morning.
- Fresh-squeezed orange juice: The bright acidity of fresh orange juice balances the richness and is a staple of the traditional French petit déjeuner.
Storage and Reheating
Room temperature: Freshly baked croissants are best eaten the same day. Store them in a paper bag (not plastic, which traps moisture and makes them soggy) at room temperature for up to 24 hours.
Freezer: Croissants freeze exceptionally well for up to 1 month. Wrap each one individually in plastic wrap and place in a freezer bag. To reheat, place the frozen croissant directly in a preheated 175°C (350°F) oven for 8 to 10 minutes. They will taste almost as good as fresh. Alternatively, freeze the unbaked shaped dough for up to 4 weeks and bake from frozen with an extended proofing time.
Reheating: Never microwave a croissant — it turns the flaky layers into a chewy, rubbery mess. The best method is to reheat in a 175°C (350°F) oven for 5 minutes. For an even crispier exterior, lightly mist the croissant with water before placing it in the oven. This creates a burst of steam that re-crisps the surface.
Common Mistakes to Avoid
1. Letting the Butter Get Too Warm
This is the number one mistake that ruins homemade croissants. If the butter softens and melts into the dough during lamination, the layers merge and you end up with a dense, bready roll instead of a flaky pastry. Work quickly, and if you see any greasy spots or the dough feels sticky, stop and refrigerate immediately for 20 minutes.
2. Over-Kneading the Dough
The détrempe should be mixed just until smooth — about 4 to 5 minutes. Over-kneading develops excessive gluten, making the dough elastic and springy. This means it will fight you during rolling, and the finished croissant will have a chewy, bread-like texture instead of a light, shattering crumb.
3. Skipping the Resting Periods
Each 30-minute rest between folds serves two purposes: it re-chills the butter and it relaxes the gluten in the dough. Skipping these rests means you will be fighting against tight, springy dough that tears the butter layers. The resting periods are not optional — they are what make the entire process manageable.
4. Proofing in a Warm Environment
Unlike bread dough, croissants must proof at a cool temperature (21 to 24°C / 70 to 75°F). Warm environments above 27°C (80°F) cause the butter layers to melt and merge into the dough. The croissants may still rise, but they will bake up greasy and flat with no visible layering. If your kitchen is warm, proof them in the coolest room of your house or even in the refrigerator for a longer, slower rise.
5. Sealing the Layers with Egg Wash
When applying egg wash, brush only the top surfaces. If egg wash drips down the sides and seals the exposed layers, those layers cannot separate and puff in the oven. Use a light hand and a soft brush, and wipe away any drips immediately.
Frequently Asked Questions
Why are my croissants not flaky?
The most common cause is warm butter. If the butter melted into the dough during lamination, the layers merge and the croissant bakes up dense and bready. Another culprit is over-kneading the initial dough, which creates too much gluten. Finally, proofing at too high a temperature can melt the butter layers before baking. Keep everything cold, knead minimally, and proof at cool room temperature.
Can I use regular butter instead of European-style?
Yes, regular unsalted butter works, but the results will be slightly less flaky and less rich. European-style butter has 82 to 86 percent fat versus 80 percent in standard butter. That small difference translates to more distinct layers and better flavor. If using regular butter, make sure it is very cold and work quickly to compensate for the higher moisture content.
How long does the entire process take?
Approximately 12 to 13 hours from start to finish, but only about 1 to 1.5 hours of that is active hands-on work. The rest is chilling and proofing time. The most efficient approach is to make the dough and do all three folds in the evening, refrigerate overnight, then shape, proof, and bake the next morning for fresh croissants at breakfast.
Can I freeze unbaked croissants?
Absolutely — this is one of the best strategies for having fresh croissants any day of the week. Shape the croissants, freeze them on a tray until solid, then transfer to freezer bags. They keep for up to 4 weeks. The night before baking, place them on a baking sheet in the refrigerator to thaw overnight, then finish proofing at room temperature in the morning.
What if my dough tears during rolling?
Small tears can be patched by pinching the dough together and continuing. If the dough is tearing repeatedly, the butter is probably too cold and brittle — let the dough rest at room temperature for 3 to 5 minutes to soften slightly. If the butter is leaking through tears, it is too warm — refrigerate immediately. Patience and temperature management solve most tearing problems.
Why are my croissants dense in the middle?
Under-proofing is the most common reason. If the croissants have not risen enough before baking, the center stays dense and doughy. Fully proofed croissants should be nearly double their original size, feel airy and jiggly when you shake the tray, and show visible layers on the sides. This can take a full 2 to 2.5 hours at cool room temperature — do not rush it.
Variations and Adaptations
Pain au Chocolat:
Instead of cutting triangles, cut the dough into rectangles approximately 10cm by 15cm (4 by 6 inches). Place a stick of dark baking chocolate (or a row of chocolate chips) about 2cm from one short edge, fold the dough over it, place a second stick of chocolate, and roll the rest of the way. The result is a rectangular pastry with two lines of melted chocolate running through the buttery layers.
Croissant aux Amandes (Almond Croissant):
This is traditionally made with day-old croissants. Split them in half, soak briefly in a light sugar syrup, spread a generous layer of almond frangipane on both cut surfaces, close, top with more frangipane and sliced almonds, and bake at 175°C (350°F) for 12 minutes until golden. Dust with powdered sugar. This is perhaps even more decadent than a fresh plain croissant.
Savory Croissants:
Reduce the sugar in the dough to just 30g (2 tablespoons). Before rolling each triangle, place a small amount of filling — smoked salmon and cream cheese, ham and Gruyère, or pesto and mozzarella — at the base and roll as usual. These make spectacular brunch centerpieces or lunchbox treats.
Whole Wheat Croissants:
Replace up to 30 percent of the all-purpose flour with whole wheat flour for a nuttier, more complex flavor. Do not substitute more than 30 percent, as whole wheat flour absorbs more liquid and develops less gluten, which can make lamination more difficult. The result is slightly denser but has a wonderful rustic character.
The Cultural Significance of the Croissant
The croissant occupies a unique place in global food culture as perhaps the most iconic pastry in the world. In France, it is far more than breakfast — it is a daily ritual, a measure of a bakery’s skill, and a source of fierce regional pride. Parisians are famously particular about their croissants, and every neighborhood has its champion boulangerie. The annual Grand Prix de la Meilleure Croissant competition draws bakers from across the country, each vying for the title with their interpretation of perfection.
The croissant’s journey from Austrian kipferl to French icon reflects a broader story about how food crosses borders and transforms. French bakers took a simple crescent-shaped bread and, through the application of laminated dough technique, elevated it into something transcendent. That spirit of taking humble ingredients and applying craft and patience to produce something extraordinary is at the heart of both French baking philosophy and what we love about home cooking.
Today, the croissant continues to inspire innovation. From the viral croissant-muffin hybrids and stuffed croissant cubes of social media to the traditional all-butter crescents that line Parisian bakery windows at dawn, this pastry proves that some recipes are timeless because they reward the effort in a way that nothing else can.
Conclusion
Making authentic French croissants from scratch is one of the most rewarding baking projects you can undertake. Yes, it requires patience — the overnight chilling, the careful folding, the slow proofing — but the actual hands-on work is surprisingly simple. The magic lies in the technique of lamination: folding cold butter into dough to create those 27 delicate layers that puff and shatter in the oven. Master that, and you will never look at a store-bought croissant the same way again. Start with this recipe, trust the process, and prepare to impress everyone at your breakfast table.
Ready for more European baking adventures? Explore our collection of European recipes or discover French-inspired dishes from our kitchen to yours.